 |
 |
Showing posts with label Blogger Tips. Show all posts
Showing posts with label Blogger Tips. Show all posts
Tuesday, September 11, 2012
 Add
a search engine in the sidebar of your blogger blog. This searches all
the posts on your blog, and displays them by latest posts first. Inside
the search bar you will find the text "Search this Site", this can
easily be changed to any text you desire. Such as "Search my Site",
"Search", "Type and Hit Enter", etc. Just simply replace the code. You
can also change the text "Go" on the button to something like "Search",
"Find", etc.
Add
a search engine in the sidebar of your blogger blog. This searches all
the posts on your blog, and displays them by latest posts first. Inside
the search bar you will find the text "Search this Site", this can
easily be changed to any text you desire. Such as "Search my Site",
"Search", "Type and Hit Enter", etc. Just simply replace the code. You
can also change the text "Go" on the button to something like "Search",
"Find", etc. Tuesday, September 11, 2012 1
Sunday, September 9, 2012
 If you aim to create a successful and profitable blog, it's best to have a general blog strategy before you create the blog.
 This plan, or blog blueprint, can be as in depth or shallow as you want it to be, but you will need a basic outline if you hope to be a successful blogger.
In order to lay the framework for your blog's strategy, you'll need to research a number of topics, websites, and keywords related to your desired niche.
Sunday, September 9, 2012 0
Wednesday, September 5, 2012

This is the uninformed way of looking at it. However, an experienced social media company may see LinkedIn from a different point of view. In fact, LinkedIn may serve a special role in a well-rounded online marketing strategy.
Wednesday, September 5, 2012 0
Sunday, September 2, 2012

Sunday, September 2, 2012 0
SEO
 Here
on Spice Up Your Blog I have always advised (Strongly) users of Blogger
to buy a domain name rather than use the free blogspot sub-domain.I
have been such a strong adversary of using a custom domain a year ago I
published the strong titled "Why Not Getting A Custom Domain For Your Blogger Blog Is Stupid ".I followed up that post with a Step By Step video tutorial on How to buy a custom domain and connect it to your Blogger blog.So I covered why to get a domain and how to get it.
Here
on Spice Up Your Blog I have always advised (Strongly) users of Blogger
to buy a domain name rather than use the free blogspot sub-domain.I
have been such a strong adversary of using a custom domain a year ago I
published the strong titled "Why Not Getting A Custom Domain For Your Blogger Blog Is Stupid ".I followed up that post with a Step By Step video tutorial on How to buy a custom domain and connect it to your Blogger blog.So I covered why to get a domain and how to get it.
 Here
on Spice Up Your Blog I have always advised (Strongly) users of Blogger
to buy a domain name rather than use the free blogspot sub-domain.I
have been such a strong adversary of using a custom domain a year ago I
published the strong titled "Why Not Getting A Custom Domain For Your Blogger Blog Is Stupid ".I followed up that post with a Step By Step video tutorial on How to buy a custom domain and connect it to your Blogger blog.So I covered why to get a domain and how to get it.
Here
on Spice Up Your Blog I have always advised (Strongly) users of Blogger
to buy a domain name rather than use the free blogspot sub-domain.I
have been such a strong adversary of using a custom domain a year ago I
published the strong titled "Why Not Getting A Custom Domain For Your Blogger Blog Is Stupid ".I followed up that post with a Step By Step video tutorial on How to buy a custom domain and connect it to your Blogger blog.So I covered why to get a domain and how to get it.Wednesday, August 29, 2012
 I
know we all like to have a unique look to our blogs and some unique
icons to display our social profiles and feeds.So here I have a Subscribe and Follow section for your blog
using a neat set of triangle social icons.You can add the icons with
links to your feed and profiles to your sidebar on Blogger and
Wordpress.
I
know we all like to have a unique look to our blogs and some unique
icons to display our social profiles and feeds.So here I have a Subscribe and Follow section for your blog
using a neat set of triangle social icons.You can add the icons with
links to your feed and profiles to your sidebar on Blogger and
Wordpress.The icons are from Design Cauldron and look fantastic,Included in the gadget we have the code for are icons for your Rss Feed, Email Feed, Facebook, Twitter, Google +, Pinterest And YouTube.You can easily remove any of the icons if your not on one or more of the sites.
Wednesday, August 29, 2012 0
Thursday, August 16, 2012

You have a young business that is organized, staffed, and ready to go through the roof. Your product or service is sound, and now all you need to do is focus on boosting sales.
Thursday, August 16, 2012 0
Tuesday, August 14, 2012
Learn how to hide,disable or remove the blogger navbar(navigation bar) from your blog.
First,let us see what blogger navbar is:

First,let us see what blogger navbar is:
Tuesday, August 14, 2012 0

Sunday, August 12, 2012
 If you have made up your mind to migrate your Google blog to wordpres
safely then redirecting your RSS subscribers and Email subscribers to
Wordpress is a must thing to do. You will need to migrate only if you
have changed your domain or moved your content to a new location or
server. Since in case of blogger to self-hosted wordpress migration,
domain remains the same therefore we will only need to redirect the
Feed. Moving your bulk of readers from one platform to another is
linked with your blog Feed address. BlogSpot blogs support both RSS and
atom Feeds whilst wordpress supports RSS web Feeds alone (though you can use plugins to switch to atom).
What we will learn today is to simply change the FEED address and let
your readers to receive email updates via your new blogging platform.
This method will shift your syndication from one network to another
without losing a single subscriber. The steps are clearly demonstrated to make your job easy. Lets get things moving!
If you have made up your mind to migrate your Google blog to wordpres
safely then redirecting your RSS subscribers and Email subscribers to
Wordpress is a must thing to do. You will need to migrate only if you
have changed your domain or moved your content to a new location or
server. Since in case of blogger to self-hosted wordpress migration,
domain remains the same therefore we will only need to redirect the
Feed. Moving your bulk of readers from one platform to another is
linked with your blog Feed address. BlogSpot blogs support both RSS and
atom Feeds whilst wordpress supports RSS web Feeds alone (though you can use plugins to switch to atom).
What we will learn today is to simply change the FEED address and let
your readers to receive email updates via your new blogging platform.
This method will shift your syndication from one network to another
without losing a single subscriber. The steps are clearly demonstrated to make your job easy. Lets get things moving!Sunday, August 12, 2012 0
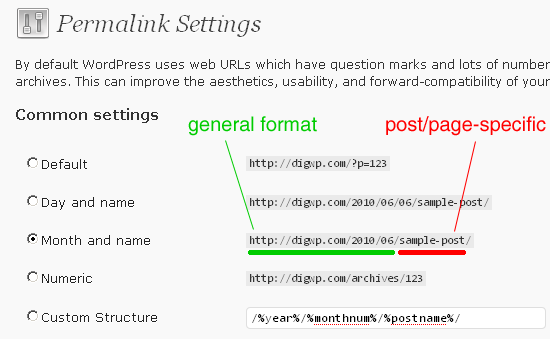 With the introduction of Custom permalinks in blogger,
you now have a great opportunity to utilize this new feature to improve
the usability, aesthetics and forward-compatibility of your links. It
also helps you to target your rich keywords. I wrote a detailed tutorial
when Custom Permalinks were first introduced in Blogger draft on June
25th 2012. Permalinks can now be seen on blogger.com also. We
highlighted several areas of this feature by discussing Character limit,
what Characters are accepted, good and bad permalink practices but
after observing the permalink keyword structure in majority of blogs, I
felt the necessity to explain its importance more because newbies are
really not using it the correct way in order to drive traffic from
Search engines. Just like a title tag, permalinks are also now a victim
of keyword stuffing. The Character limit for a permalink is different
for both Google, Bing and Yahoo. Understanding this restriction is what
we will learn today. You will also learn today why You should always follow Mashable but not always TechCrunch when you talk of SEO.
With the introduction of Custom permalinks in blogger,
you now have a great opportunity to utilize this new feature to improve
the usability, aesthetics and forward-compatibility of your links. It
also helps you to target your rich keywords. I wrote a detailed tutorial
when Custom Permalinks were first introduced in Blogger draft on June
25th 2012. Permalinks can now be seen on blogger.com also. We
highlighted several areas of this feature by discussing Character limit,
what Characters are accepted, good and bad permalink practices but
after observing the permalink keyword structure in majority of blogs, I
felt the necessity to explain its importance more because newbies are
really not using it the correct way in order to drive traffic from
Search engines. Just like a title tag, permalinks are also now a victim
of keyword stuffing. The Character limit for a permalink is different
for both Google, Bing and Yahoo. Understanding this restriction is what
we will learn today. You will also learn today why You should always follow Mashable but not always TechCrunch when you talk of SEO. Thursday, April 12, 2012
 Its really important to keep everything as attractive as possible while writing posts. Text Area boxes are a useful method of showing long bunch of text or code on your blog. Just last month I wrote two posts 25 Vertical Navigation Menus and 30 Horizontal Navigation Menus where I have used a lot of coding and all those coding were displayed inside fully customized text areas that made the post looked clean and neat. Text boxes are good only if there length and height is well controlled and today with this tutorial we will learn several ways of styling our default text areas.
Kindly see a demo first,
Before

After

How to Customize the Text Area Box?
To do this follow the steps below,- Go to Blogger > Layout > Edit HTML
- Search for </b:skin>
- And just above it paste the code below,
.mbt-textarea {4. Finally save your template!
padding:0;
margin:0;
background: #fff;
width:400px;
height:40px;
color:#666;
font:12px arial;
border:1px dotted #289728; }
.mbt-textarea:hover {
color:#289728;
border:2px solid #666;
}
How to show the Stylized Text Area Effect inside Blogger Posts?
To display this customized text area you only need to add the following code in the Edit HTML section of your Blogger Editor,<textarea class="mbt-textarea" readonly="readonly">WRITE-TEXT-HERE</textarea>
Simply replace WRITE-TEXT-HERE with your text that you want to appear inside a box.
How to Customize The CSS of The Text Box?
If you wish to change the font, color or in short the entire look of the text box then you just need to edit the following areas in the CSS code above,background: #fff; –> This Changes background color of the text area
width:400px; –> This changes width size of box
height:40px; -> This changes box height
color:#666; -> This changes font color inside text box
font:12px arial; –> This changes font size and font family respectively
border:1px dotted #289728; } –> This changes the border size, style (i.e dotted, solid, dashed) and color. Editing it will change the look of the border/outline across the text
.mbt-textarea:hover {
color:#289728; –> This changes font color on mouse hover
border:2px solid #666; -> This changes border size, style and color on mouse hover
Now Simply edit the above codes as guided and create a perfectly suiting Text box for your beloved blogs. I hope it will be as interesting for most of you as it seems :> Do not hesitate to ask for any help if needed!
Thursday, April 12, 2012 0
 You might have seen a roll over Image effect in many professional and commercial blogs. By roll over I mean that when you hover your mouse cursor on the Image, the image border colour and style/appearance changes. Well using some simple CSS you can add some amazing effects to your Blog Images. Without wasting any time lets jump straight to the steps to be followed.
This tutorial uses a simple pattern for adding codes i.e First you will need to add a CSS code just above ]]></b:skin> and then you will need to add a small HTML code like class="xyz" to the image code inside your posts. That’s it! :>
First and Foremost See them in action!
How To Add the Top 10 Amazing Image Mouse Hover Effects To Blogger?
To do this follow these steps,- Go to Blogger > Layout > Edit HTML
- Search for ]]></b:skin>
- And now paste any of your preferred CSS: code just above ]]></b:skin>

Number #1
CSS:.simple1 {HTML:
padding:5px;
border:1px solid #ccc;
}
.simple1:hover {
padding:5px;
background-color:#ccc;
}
class="simple1"
Number #2
CSS:.simple2 {HTML:
padding:5px;
background-color:#ccc;
border:1px solid #ddd;
}
.simple2:hover {
padding:5px;
background-color:#eee;
border:1px solid #666;
}
class="simple2"
Number #3
CSS:.black-white {HTML:
padding:5px;
border:1px solid #ccc;
}
.black-white:hover {
padding:5px;
background-color:#fff;
border:10px solid #000;
}
class="black-white"
Number #4
CSS:.dashed {HTML:
padding:5px;
border:1px solid #ccc;
}
.dashed:hover {
padding:5px;
background-color:#fff;
border:2px dashed #000;
}
class="dashed"
Number #5
CSS:.top-bottom {HTML:
padding-top:5px;
padding-bottom:5px;
border-top:3px solid #ddd;
border-bottom:3px solid #ddd;
}
.top-bottom:hover {
background-color:#fff;
border-top:3px solid #000;
border-bottom:3px solid #000;
}
class="top-bottom"
Number #6
CSS:.curtain {HTML:
padding-top:10px;
padding-bottom:10px;
border-top:2px solid #ddd;
background-color:#000;
border-bottom:2px solid #ddd;
}
.curtain:hover {
background-color:#fff;
border-top:3px solid #000;
border-bottom:3px solid #000;
}
class="curtain"
Number #7
CSS:.red {HTML:
padding:5px;
border:1px solid #ccc;
}
.red:hover {
padding:5px;
background-color:#E71305;
border:10px solid #ddd;
}
class="red"
Number #8
CSS:.Fadein{HTML:
filter:alpha(opacity=100);
-moz-opacity: 1.0;
opacity: 1.0;
border:0;
}
.Fadein:hover{
filter:alpha(opacity=50);
-moz-opacity: 0.30;
opacity: 0.30;
border:0;
}
class="Fadein"
Number #9
CSS:.Fadein2{HTML:
filter:alpha(opacity=50);
-moz-opacity: 0.30;
opacity: 0.30;
border:2px solid #000;
}
.Fadein2:hover{
filter:alpha(opacity=100);
-moz-opacity: 1.0;
opacity: 1.0;
border:2px solid #000;
}
class="Fadein2"
Number #10
CSS:.thumbnail{HTML: For knowing how to apply this popping effect in detail read this post –> Image Pop-up Effect
position: relative;
z-index: 0;
}
.thumbnail:hover{
background-color: transparent;
z-index: 50;
}
.thumbnail span{
position: absolute;
background-color: #7AA1C3;
padding: 0px;
left: -1000px;
border: 1px solid gray;
visibility: hidden;
color: white;
text-decoration: none;
}
.thumbnail span img{
border-width: 0;
padding: 0px;
}
.thumbnail:hover span{
visibility: visible;
top: 0;
left: 5px;
}
<a class="thumbnail" href=""><img src="Add Image URL Here" width="100px" height="100px" border="0px" /><span><img src="Add Image URL Here" /><br /> Image Description here </span></a>
You can enjoy playing with these codes using HTML Editor. I hope you will find this tutorial pretty useful in further enhancing your cool blogging experience :>>
Releasing Highly Stylized “Contact Me” Form For Bloggers and Web Developers – Available For Free Of Charge!
 A Contact Form is a must for every website and weblog for feedback and suggestion purposes. There are many free email services that let you create free online Contact Forms but most of these forms are casual in look and appearance and are already used by millions of websites. Then how can you make your free form look any different from others?
Well luckily after spending some hours of hard work I have successfully created a well stylized and optimized code that is unique in every aspect and that is capable enough to turn your free Contact form from this,

to this,

This new stylized version has CSS effects added to it. Text inside fields appear in different colours and the radio buttons change colour on mouse hover. Click Here to see it in action.
You need to follow two simple steps to get to the end result,
- Sign Up to create a Normal Contact Form
- Stylize Your Contact Form*
Sign Up To Create A Normal Contact Form
First and foremost you need an account at a free email service to create a normal looking contact form which will be controlled by the email service itself. Go to Email Me Forms and Sign Up for an account and then follow the steps belowGo To Control Panel
After you have created an account click the link “Create a New Form” at the right-hand pane under Control Panel as shown below,
Then There will a total 7 steps which are illustrated in the images below. But Before going for step#1 kindly create a thank you page for your blog. This thank you page will appear when readers have successfully submitted their message to you using the contact form. You can see my Thank you Page as an example. Make sure you give it an old date.
Once you have created it then follow each step below carefully,
1. Step#1
Add a name for your contact form, enter your email address, leave spam Email address emtpy, add your thank you page URL/link and let number of fields be 6.
Hit Next
2. Step#2
Change your options to the ones shown in the image below. As far as the Required? Portion is concerned, you can set it according to your will but set other options the way they are shown in the image below,
Hit Next
3. Step#3
Change your options to exact ones below,
Hit Next
4. Step#4
For step 4 only edit the part as shown in the image below and leave the above portion as default. Make changes for regions indicated by blue arrows only.
Hit Next
5. Step#5
Follow the image below,
Hit Next
6. Step#6
And this is how your contact form looks like,
Hit Next
7. Step#7
Copy the link indicated in the image below. This is your the ID for your form. We only need this ID link and not the HTML code they provide because you deserve a better stylized code!
Now jump to the next important part shared below
Stylize Your Contact Form
First you will need to add a CSS code to your selected blogspot template. To do this follow the steps below,- Log into your blogger account
- Go to Layout > Edit HTML
- Back Up your template
- Search for ]]></b:skin>
- And finally add the code below just above ]]></b:skin>
input.mbt1 {
color:#FF8E1F;
font:10px 'trebuchet ms',helvetica,sans-serif;
background-color:#fff;
border:1px dotted #0080ff;
}
input.mbt1hov {
color:#0080ff;
font: bold 10px 'trebuchet ms',helvetica,sans-serif;
border:1px solid;
}
textarea {width:100%; color:#0080ff;
font:12px 'trebuchet ms',helvetica,sans-serif;
background-color:#fff;
border:1px dotted #0080ff; }
textareahov { width:100%;
color:#0080ff;
}
- Save Your template
- First Create a Welcome Note as shown in the image below. You can see my Welcome Note as an example.
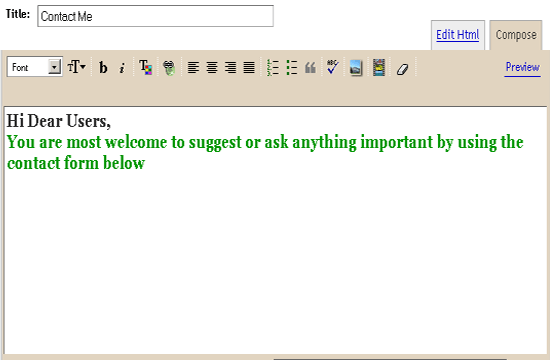
- Then Click the Edit HTML tab at the top right-hand corner and add the code shared below just below the visible text.
<form action="PASTE THE EMAIL ME FORM ID LINK HERE" charset="UTF-8" enctype="multipart/form-data" method="post"><table bg="" border="0" cellpadding="2" cellspacing="0" style="color:white;"><tbody><tr><td><span style="font-family:Verdana;font-size:85%;color:black;"></span><div id="mainmsg"></div></td></tr></tbody></table><table bg=""border="0" cellpadding="2" cellspacing="0" style="color:white;"><tbody><tr valign="top"><td nowrap="nowrap"><span style="font-weight: bold; color: rgb(102, 102, 102);font-family:Verdana;font-size:10px;">Name</span></td><td><input class="mbt1" maxlength="100" name="FieldData0" size="30" value="" type="text"> </td></tr><tr valign="top"><td nowrap="nowrap"><span style="font-weight: bold; color: rgb(102, 102, 102);font-family:Verdana;font-size:10px;">Email</span></td><td><input class="mbt1" maxlength="100" name="FieldData1" size="30" value="" type="text"> </td></tr><tr valign="top"><td nowrap="nowrap"><span style="font-weight: bold; color: rgb(102, 102, 102);font-family:Verdana;font-size:10px;">Country</span></td><td><input class="mbt1" maxlength="100" name="FieldData2" size="30" value="" type="text"></td></tr><tr valign="top"><td nowrap="nowrap"><span style="font-weight: bold; color: rgb(102, 102, 102);font-family:Verdana;font-size:10px;">Age</span></td><td><input class="mbt1" maxlength="100" name="FieldData3" size="30" value="" type="text"></td></tr><tr valign="top"><td nowrap="nowrap"><span style="font-weight: bold; color: rgb(102, 102, 102);font-family:Verdana;font-size:10px;">Subject</span></td><td><input class="mbt1" maxlength="100" name="FieldData4" size="60" value="" type="text"> </td></tr><tr valign="top"><td nowrap="nowrap"><span style="font-weight: bold; color: rgb(102, 102, 102);font-family:Verdana;font-size:10px;" >Message</span></td><td><textarea cols="60" name="FieldData5" rows="10"></textarea></td></tr><tr><td colspan="2"></td></tr><tr><td></td><td align="left"><input maxlength="100 " name="hida2" size="3" style="display: none;" value="" type="text"><input onmouseover="this.className='mbt1 mbt1hov'" onmouseout="this.className='mbt1'" class="mbt1" name="Submit" value="Submit " type="submit"> <input onmouseover="this.className='mbt1 mbt1hov'" onmouseout="this.className='mbt1'" class="mbt1" name="Clear" value=" Clear " type="reset"></td></tr><tr><td colspan="2" align="center"></td></tr></tbody></table></form>
Kindly replace the bolded green text in the code above with the URL of your contact form. Copy this code as it is and don’t try to edit it. Paste it as instructed in the image below,
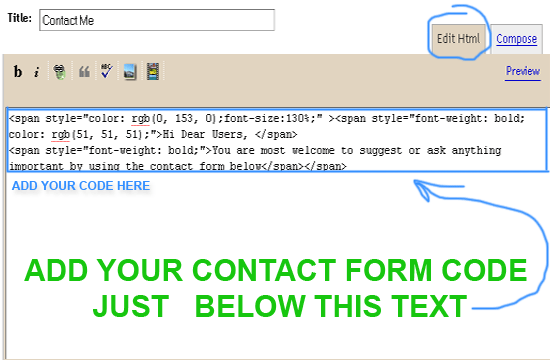
- That’s it, You are Done! Click the Publish Button and see a beautiful contact form on your weblog
 Today's tutorial is the most demanded and most wished but rarely answered in blogosphere. For some designers customizing the Blogger Comment Form is somehow not possible whilst for others it is tricky but from today onwards InshAllah every blogger will actually be able to customize the Blogger Comment Form in the best way possible! After some trial and errors we actually succeeded in altering Blogger’s official CSS coding. We are happy to have brought you with a tutorial that will indeed enable you to have a customized Comment Form far better than that of Wordpress, Typad etc. Please have a look at some examples below,

Now Hover Your Mouse Cursor at these comment forms for 3-4 seconds to see something different!


We hope you liked this new discovery! Lets now learn how to customize the blogger comment form/box to suit your preferences.
Adding A Customized Comment Form To Your Blog
Note:- The Following CSS code is for the Comment Form With a Baby in it. Other CSS codes will be provided to subscribers only. If you haven’t subscribed yet kindly subscribe now and inform us by leaving a comment with your Email ID.Follow these steps,
- Go To Blogger > Layout > Edit HTML
- Check The Box “Expand Widget Templates” at the top right corner.
- Search for the code below, Tip:- Press Ctrl + f
<div class='comment-form'>4. Replace this code with the code below,
<div id='mbt-form'>5. Now Search for ]]></b:skin>
6. Just above ]]></b:skin> paste the CSS code below,
#mbt-form iframe{7. Save your template and view your blog to see a different touch :>
background:#ffffff url(https://blogger.googleusercontent.com/img/b/R29vZ2xl/AVvXsEgyANsFsAu-f1Vpz1OJ-qEF6lTn9OGI2rBjq9OYUHKDytHi0FaDW2UqtRGds4dVZ7kxXwhgwS4BTiaIoX5QKBM4t9Y4-3g5p99Yim_x4KWaljH-xQYsUzoZ6qbz-XLArTg7wG1khAI6HdnY/s400/plz-do-not-spam1.gif) no-repeat bottom right;
border:7px solid #C7C7C7;
padding:5px; font:normal 12pt "ms sans serif", Arial; color:#7EB2AC; width:450px; }
#mbt-form iframe:hover{
background:#ffffff url(https://blogger.googleusercontent.com/img/b/R29vZ2xl/AVvXsEh2uMQOS6if_cRT3bewUp4XxDbL8NyOl41gTLJLFiRL9aSuOoOmqb3mP1PvJeIPgmg0-V5pKxF4R-tkrJX14JaETZbyuekpJnuthuxQLHbek6Qu8o6Ngi6m09wbsd2CpnaFvqggHh7NBln3/s400/plz-do-not-spam2.gif) no-repeat bottom right; border:7px solid #7EB2AC;
}
#mbt-form a{
color:#7EB2AC;
}
Customize The Blogger Comment Form To Suit Your Blog Layout
Now Lets discuss the important areas in the CSS code above to help you customize your Blogger comment form according to your preferences.There are three important areas, which are,
#mbt-form iframeHere are the details for each section
#mbt-form iframe:hover
#mbt-form a
1. Customization For Active Mode
#mbt-form iframeThis part is responsible for the active appearance of comment box when mouse cursor is not hovered on it. It includes the following style properties,
background: This property is responsible for the background color, background image and background image’s position. Where,
- #ffffff : This is the background color. You can change it using our Color Chart
- url : This is the URL for the background image. I used the baby in this case. You can change this image with anything you like.
- bottom right: This positions the background image. I positioned the baby on bottom right corner. You can position the image at bottom right or bottom left or top right or top left
- border size to 7px,
- border style to solid. You can choose solid, dotted, dashed etc. See this page on border styles
- border color to #C7C7C7. Use our CSS Color Chart for using a different color.
font: This CSS property defines the boldness, font family and the size of the text. I have set the following for the text “Comment as:”
- boldness to normal,
- size to 12pt
- font family to "ms sans serif". If in case the browser doesn’t has the "ms sans serif" font then I have set Arial as a backup.
width: This property sets the width of your Comment Form. You can see the comment from of my blog is wider than normal because I have adjusted its width. Set the width of your comment form a bit smaller than that of your post width. You can find your post width by finding the following code in your template (Edit HTML)
.post
2. Customization For Mouse Hover Mode Now lets discuss the CSS properties for the form’s appearance when a mouse cursor is hovered on it.
#mbt-form iframe:hoverIt has almost the same explanations for background and border as we discussed earlier. Setting these two CSS properties will effect the second image only that appears on mouse hover.
3. Customization For The Link Colors
#mbt-form aThis part defines the color of these two links -> “Sign out” and “Subscribe by email” . These links appear at bottom right corner of every Blogger Comment Form.
color: This sets the link color. Set a link color as contrast to the background color.
That’s All!
I hope this tutorial will be of great help to bloggers and designers. We request everyone to kindly link back if you wish to share this unique tutorial with your readers and friends. We thank you for your patience. Any question is welcomed :>
 By default almost widgets in blogger blogs are editable. By Clicking the edit button, you can either perform edit, remove or cancel functions. You may have observed that some widgets can not be removed from page elements for example the Header widget which lets you add a background image to your header or add your site logo. All those widgets which can not be removed are LOCKED and we learn today how to UNLOCK those widgets. We will also learn how to LOCK any widget we want so that it could only be edited but not removed.
How To LOCK/UNLOCK a Widget in Blogger?
- Go To Blogger > Design
- You will see many widgets in your page element section. Get the ID of the widget you want to remove. You can get the widgetID by placing your mouse cursor at the Edit link of that specific widget. You will see a link appearing near the status bar of your Mozilla/Chrome browser like this,

3. Simply note down the widgetID which in my case is HTML12. You widget ID is one that appears between widgetid= and &action
The Widget that you want to lock looks like this in UNLOCK mode,
UNLOCK MODE:


You can clearly see that there are three buttons which are REMOVE, CANCEL and SAVE
Now we want to delete the REMOVE button so that the widget could only be edited but not removed.
4. Now go to Blogger > Design > Edit HTML
5. Backup your template
6. Search for your widget ID. (In my case I will search for HTML12
7. You will find a code similar to this,
<b:widget id='HTML12' locked='false' title='Subscribe Now!' type='HTML'/>8. Now to LOCK the widget simply let locked to true
9. Save your template and Your Widget is now LOCKED.
Go to Page Elements section and you will see that your widget has no REMOVE button now.
LOCKED MODE:

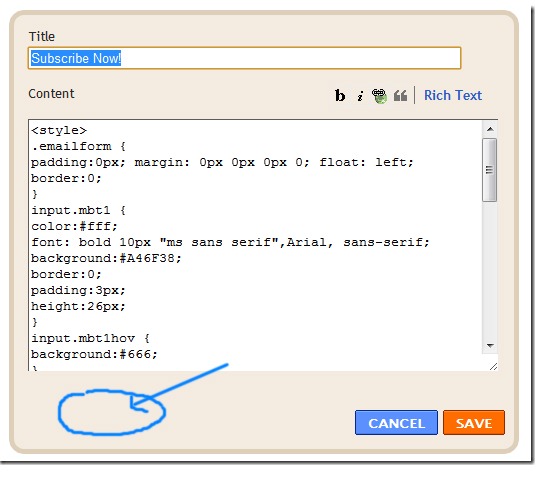
To UNLOCK the widget back, simply repeat the same process and change locked to false
That's all! Have fun :>
 We can make a custom navbar using the Blogger Official Search and Navbar widget provided in different color schemes. This is again a great trick using the Iframe Technique. This idea came into my mind just last night when I observed that the source file of our blog had two Iframed widgets one is the poll widget and another is the Navbar. Fortunately, this is again a first time shared tutorial by us. Although we often remove Blogger Navigation bar but its Search function and share and follow links can prove very important.
 Below you can see a customized version of the same navbar in two modes.

When users Log out of Blogger, they see this:

On clicking the share link, readers can share your blog post on Twitter, Facebook, Google Buzz or Google Reader.

On clicking the follow button, you can follow the blog updates:

The following Navigation colours are available:
TAN:

BLACK:

SILVER:

BLUE:

Add Blogger Navbar To Sidebar
You can use the code below to add the Navbar anywhere you want and not just the sidebar. You can add it to your blog posts also. To add the widget to your sidebar simply do this:- Go to Blogger > Design
- Choose a HTML/JavaScript Widget
- and Paste the code below inside it,
Make these changes:<iframe
src="http://www.blogger.com/navbar.g?targetBlogID=8193278726666811965&
blogName=My+Blogger+Tricks&publishMode=PUBLISH_MODE_HOSTED&
navbarType=SILVER&layoutType=LAYOUTS&
searchRoot=http%3A%2F%2Fwww.mybloggertricks.com%2Fsearch&
blogLocale=en&homepageUrl=http%3A%2F%2Fwww.mybloggertricks.com%2F&"
marginwidth="0" marginheight="0" scrolling="no"
frameborder="0" height="30px" width="237px" id="navbar-iframe"
allowtransparency="true" title="Blogger Navigation and Search"></iframe>
- Replace 7193277726666811965 with your BLog ID. Go To Blogger > Design and now look in your browser address bar, you find a long digit code. Copy it and paste it in place of this number 7193277726666811965
- Replace My+Blogger+Tricks with your Blog Name. It is the name of your blog that you see in your blogger dashboard. Remember to separate each word with a plus sign (+)
- Replace SILVER with your prefered colour scheme in capital letters. You can try four colour schemes which are : 1) BLUE 2) BLACK 3) SILVER and 4) TAN
- Replace www.MyBloggerTricks.com with your blog link (exclude http://) If your blog URL is http://xyz.blogspot.com then simply write xyz.blogspot.com
View your blog and start playing with the official search box along with the free follow and share option. Have fun!
Subscribe to:
Posts (Atom)


