 |
 |
Showing posts with label Blogger Widgets. Show all posts
Showing posts with label Blogger Widgets. Show all posts
Tuesday, September 11, 2012
 Add
a search engine in the sidebar of your blogger blog. This searches all
the posts on your blog, and displays them by latest posts first. Inside
the search bar you will find the text "Search this Site", this can
easily be changed to any text you desire. Such as "Search my Site",
"Search", "Type and Hit Enter", etc. Just simply replace the code. You
can also change the text "Go" on the button to something like "Search",
"Find", etc.
Add
a search engine in the sidebar of your blogger blog. This searches all
the posts on your blog, and displays them by latest posts first. Inside
the search bar you will find the text "Search this Site", this can
easily be changed to any text you desire. Such as "Search my Site",
"Search", "Type and Hit Enter", etc. Just simply replace the code. You
can also change the text "Go" on the button to something like "Search",
"Find", etc. Tuesday, September 11, 2012 1
Wednesday, August 29, 2012
 I
know we all like to have a unique look to our blogs and some unique
icons to display our social profiles and feeds.So here I have a Subscribe and Follow section for your blog
using a neat set of triangle social icons.You can add the icons with
links to your feed and profiles to your sidebar on Blogger and
Wordpress.
I
know we all like to have a unique look to our blogs and some unique
icons to display our social profiles and feeds.So here I have a Subscribe and Follow section for your blog
using a neat set of triangle social icons.You can add the icons with
links to your feed and profiles to your sidebar on Blogger and
Wordpress.The icons are from Design Cauldron and look fantastic,Included in the gadget we have the code for are icons for your Rss Feed, Email Feed, Facebook, Twitter, Google +, Pinterest And YouTube.You can easily remove any of the icons if your not on one or more of the sites.
Wednesday, August 29, 2012 0
Tuesday, August 28, 2012
One of the things I wanted to do with these icons was have the name of the service on each.While everyone is familiar with the Facebook and Twitter logos I feel some newbies online are often confused by some icons.
Tuesday, August 28, 2012 0
Sunday, August 26, 2012

Sunday, August 26, 2012 0
Thursday, April 12, 2012
Friday, February 17, 2012
How to add Google +1 (plus one) button to blogger?

Google +1 sharing button is like Facebook like button, both have the same purpose i.e to show your friends that you recommend something that you found on web. Facebook shows the recommendations on the person's profile (who liked) while google +1 will be shown on the Google Search results.
This video would better explain how Google +1 Works:
How to Add Google +1 button to blogger posts
- Go to Dashboard > Design > Edit HTML and Back up your template
- Check the Expand Widget Templates checkbox on top right of the code window.

- Find the following code in your HTML:
<data:post.body/>
- Paste the +1 button code immediately below (after) it:
<!-- Google +1 button Start -->

<b:if cond='data:blog.pageType != "static_page"'>

<div style='float:left;padding:10px;'>

<script type="text/javascript" src="https://apis.google.com/js/plusone.js"></script>

<g:plusone expr:href="data:post.url" size="standard" count="true"></g:plusone>
</div>
</b:if>

button End -->

<!-- Google +1 button ends -->
Save your Template and you are done.
Further Customization
Google +1 for Blogger can be further customized:
- Select the size of button by replacing the value of size with a value from the table below.

Table by: bloggersentral.com - You can remove the count by replacing the value of count from true to false.
- If you want your Google +1 button under the blogger post title then you would have to paste the Google +1 button Code Before <data:post.body/>
- If you want to show your +1 Google Button on the right side , simply change float:left to float:right , add the code and save your template.
Friday, February 17, 2012 0
The Classic Subscribe widget for Blogger
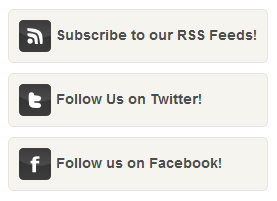
Live Demo
Step 1: Add the classic subscribe widget to Blogger Blogs?
- Go to Blogger >> Design.
- Add a Gadget.
- Select HTML/JavaScript and paste the following code in it:
<style>

/*  ---------My Blogger Tips Social Media Widget----------- */

.social-connect-widget{background:#F5F4EF;border:1px solid #E7E6DE;padding:10px; border-radius:5px; -moz-border-radius:5px;}
.social-connect-widget:hover{border:1px solid #CBCBC2;background:#FFF}
.social-connect-widget a{text-decoration:none;font-weight:bold;font-family:Arial,Helvetica,Sans-serif;color:#4B4D4E}
.social-connect-widget a:hover{text-decoration:underline;color:#F77C04}
.social-connect-widget img{vertical-align:middle;margin-right:5px;height:32px;width:32;}
</style>


<div class='social-connect-widget' style='margin-top:0px;margin-bottom:10px;'>
<a href='http://feeds.feedburner.com/USERNAME'><img alt='RSS Feed' src="https://blogger.googleusercontent.com/img/b/R29vZ2xl/AVvXsEgf_PQBOri9f2q0gs1_uQlOmqWLXGSCpw3Sp9IScyVmr0YlEV5Uiq_ozAkVlDPTKldDb_OCp8jdv8IRnbti25i6Xp2dLh5FRahlPfmUhvhKePClgkOpF6V-XlY6rf8LGTHaR0PVA-mwbuYM/s1600/rss.png"/></a><a href='http://feeds.feedburner.com/USERNAME'>Subscribe to our RSS Feeds!</a>
</div>

<div class='social-connect-widget' style='margin-bottom:10px;'>
<a href='http://twitter.com/USERNAME'><img alt='Follow Us on Twitter!' src="https://blogger.googleusercontent.com/img/b/R29vZ2xl/AVvXsEgeQw2sWrk2nDWDL9nmB9APvvqa7Dp-PG6igBeVvZKLeah1mdR3E7EbeziIZOZKMun3WiM3tcSfN4BQgLZcwXzkUaIOQ7LhTAfwiQ0_RfDFH1T45PidenQh8Fr1gNnZUgr9aDLbBLQkjKmJ/s1600/twitter.png" title='Follow Us on Twitter!'/></a><a href='http://twitter.com/USERNAME'>Follow Us on Twitter!</a>
</div>
<div class='social-connect-widget' style='margin-bottom:10px;'>
<a href='http://facebook.com/USERNAME'><img alt='Be Our Fan!' src="https://blogger.googleusercontent.com/img/b/R29vZ2xl/AVvXsEjjtVzhbi7Lz168SGxb_eNzmqWvRqWQq8z0sI0ujB_IfL2oSQPowDmIsnZ6iiN4OEZbA7MeQHS2KceYMCcC5Goj_EpigwuNMI4bElpMwt1S3XazFceu3YW3I2ZF5lnPD9lnbGCZ_wsffL5c/s1600/facebook.png' title='Be Our Fan"/></a><a href='http://facebook.com/USERNAME'>Follow us on Facebook!</a>
</div>
- Before saving, Proceed to the next step.
Step 2: Add your own values!
You need to replace the following with your own.- http://feeds.feedburner.com/USERNAME with your own Feedburner id.
- http://twitter.com/USERNAME with your own Twitter id.
- http://facebook.com/USERNAME with your own Facebook fan page link.
Save and you are done. :)
More Cool Widgets and Tips are on its way, Subscribe to stay tuned!
 If you enjoyed this post and wish to be informed whenever a new post is published, then make sure you Subscribe to get regular updates.




Magnetic Featured posts with Thumbnails Widget for Blogger Blogs
Featured Posts are basically some posts within your blog that you want to highlight to your readers, separately. It's kinda great way to direct your readers to a certain post that you wan't them to check out. The reason I designated the word "Magnetic" to this Gadget is that it has the capability to attract your readers' attention and deliberation and it would make your blog look more astonishing. So lets get to work and show you how to add the "Featured Posts widget" to your blogs.

(You can See the Demo below on this blog)
How to add Featured posts Widget to Blogger Blogs?
Follow these steps exactly as mentioned:- Go to Blogger.
- Design > Edit HTML.
- Expand Widget Templates.
- Find ]]></b:skin> and place the following CSS code just above it.
/*----------- My Blogger Tips Featured Posts -----------------*/
#mbtipsboxes{height:320px;overflow:hidden;margin:0px;position:relative;width:938px;background:#F2F1F1;border:8px solid #333; border-radius: 1px; -moz-border-radius: 1px; padding:5px 5px;}
#mbtipsboxes ul{ margin-left: 10px; padding: 0pt; position: relative; list-style-type: none; z-index: 1;  width: 100%; }
#mbtipsboxes ul li{ overflow: hidden; float: left; width: 228px; height: 295px; border-top:0px solid #333; margin-right:6px; padding:2px 0px 4px 0px;}
#mbtipsboxes ul li:hover{ border-bottom:1px solid #636363; }
#mbtipsboxes img{width:210px;height:210px; padding:2px; border: 0px solid #A3A3A3; border-radius:10px; -moz-border-radius:10px;  margin-top:0px;}
#mbtipsboxes img:hover{border: 0px solid #8B8B8B; }
.mbtipsbody img{float:center}
.mbtipsbody {position:relative;margin:0 5px 0 5px;width:170px;height:210px;display:inline;float:center;color:#c4c4c4}
.mbtipsbody h3{padding:5px 0;font-size:12px;font-weight:bold; font-family: verdana, sans-serif, arial; margin:0; text-align:center}
.mbtipsbody h3 a:link,.mbtipsbody h3 a:visited{color:#2F97FF;}
.mbtipsbody h3 a:hover{color:#c5c5c5}
.mbtipsbody p{margin:0; padding:0 0;color:#636363;font:10px normal verdana, sans-serif, Arial; text-align:center}
.Fadein3 img {
filter:alpha(opacity=80);
opacity: 0.8;
border:0;
}
.Fadein3:hover img {
filter:alpha(opacity=100);
opacity: 1.0;
border:0;
}
5. Save it and proceed to the next step.
6. Go to Design > add a Gadget > HTML/JavaScript and add the following code to it
<div id="mbtipsboxes">
<div style="left: 0px; overflow: hidden; position: relative; visibility: visible; width: 100%; z-index: 2;">
<ul>
<li>  <div class="mbtipsbody">
<a class="Fadein3" href="Post 1 URL">  <img height="195" src="Post 1 IMG" width="195" />  </a>
<div class="clear">
</div>
<h3>
<a href="Post 1 URL">Post 1 Title</a></h3>
<p>Post 1 Description</p></div>
</li>
<li>  <div class="mbtipsbody">
<a class="Fadein3" href="Post 2 URL">  <img height="195" src="Post 2 IMAGE URL" width="170" />    </a>
<div class="clear">
</div>
<h3>
<a href="Post 2 URL">Post 2 TITLE</a></h3>
<p>Post 2 Description</p></div>
</li>
<li>  <div class="mbtipsbody">
<a class="Fadein3" href="Post 3 URL">  <img height="175" src="Post 3 IMAGE URL" width="195" />  </a>
<div class="clear">
</div>
<h3>
<a href="Post 3 URL">Post 3 TITLE</a></h3>
<p>Post 3 Description</p>
</div>
</li>
<li>  <div class="mbtipsbody">
<a class="Fadein3" href="Post 4 URL" rel="nofollow">  <img height="100" src="Post 4 IMAGE URL" width="170" />  </a>
<div class="clear">
</div>
<h3>
<a href="Post 4 URL" rel="nofollow">Post 4 TITLE</a></h3>
<p>Post 4 Description</p></div>
</li>
</ul>
</div>
</div>
7. Click save , and you are done.
Customize the CSS
You can do pretty much customization but the basic would be:- To change the background simply replace background:#F2F1F1; with your own value.
- To customize the width of the entire widget just change width:938px; with your own value.
Add your own Featured Posts links
You need to replace these values with your own.- Post URL(s) with your own links.
- Post IMAGE URL(s) with your own image links.
- Post Title(s) with your own Featured Post Titles.
- Post Description(s) with your own Featured Posts' Description.
Hand Drawn social media widget with Feedburner chicklet and subscribe button!

I usually love to play around with blogger widgets that I've designed, combine one with another (like I've combined Pro Subscription widget and Hand Drawn Social Media icons' widget here). My most recent widget is the Feedburner Chicklet with subscribe button, by combining it with the hand drawn social media widget it looks very appealing. I mean it really can gather a whole lot of visitors' attention and ultimately would result in boost in subscriptions. It's the perfect subscribe widget for your blogger blog. The installation process is quite easy, no need to edit the HTML of your template
(You can see the Demo here on this blog)
Step 1: Installation Process!
Follow the steps below exactly as mentioned.- Go to Blogger >> Design.
- Add a Gadget.
- Select HTML/Javascript and paste the code below within that.
<style class="text/css">
table
{
border-bottom: 1px solid #E6E6E6;
float: center;
width: 280px;
margin:10px 0 0 20px;
}
.subicons
{
border-right: 1px solid #E6E6E6;
}
.Fadeout {
filter:alpha(opacity=100);
opacity: 1.0;
border:0;
}
.Fadeout:hover{
filter:alpha(opacity=80);
opacity: 0.8;
border:0;
}
</style>
<div class="table">
<table>
<tr>
<td><div class="subicons"><a class="Fadeout" href="http://www.facebook.com/pages/My-Blogger-Tips/220561111314693" imageanchor="1" target="_blank" rel="nofollow"><img border="0" src="https://blogger.googleusercontent.com/img/b/R29vZ2xl/AVvXsEhhgsZ9n_a8OSuc_KmYGDFdK6z0_KY3RPYI_9caHn__46iplKJBAdKRizbxbzZ8yX6Nc9blVAsMW9ziZWLF4wedaNpXJ-0THCNuPD51D9QAmbk8MHfzcD6FGK2Qz2k9vflXYkjg-mUx_8va/s1600/facebook-48.png" /></a></div></td><td><div class="subicons"><a class="Fadeout" href="http://twitter.com/mybloggertips" imageanchor="1" target="_blank" rel="nofollow"><img border="0" src="https://blogger.googleusercontent.com/img/b/R29vZ2xl/AVvXsEhoxHp6Fwst03Q-FnKxFACb5smdOxYPc8MgNgbFcz6bZ8TvPwQEj74RFBnFSp68_0Rj5rymHECtp3VNc7qpRkXWaYYbTWYivgotp9VBzD7xQMi5H-DvCxuEUhvi13gpa4ZR1761pbjiWMu7/s1600/twitter-48.png" /></a></div></td>
<td><div class="subicons"><a class="Fadeout" href="http://feeds.feedburner.com/mybloggertips" imageanchor="1" target="_blank" rel="nofollow"><img border="0" src="https://blogger.googleusercontent.com/img/b/R29vZ2xl/AVvXsEg-QcPM1cBqJWscl6G7XdF_MrSmaGLgtymF-FBNEUquzPUciJP4dx3fb7YmoFMcILi1quiOEEVEA4m9qiQFilLC1weldsjFjpilbBPn60lKrhf3dIMOaKxdJpsynZdjFt5CfA03GJN4UQjr/s1600/rss-48.png" /></a></div></td>
<td><a class="Fadeout" href="https://plus.google.com/110875602250977569192/posts" imageanchor="1" target="_blank" rel="nofollow"><img border="0" src="https://blogger.googleusercontent.com/img/b/R29vZ2xl/AVvXsEjXPSump8ptgcs2JYih80NtxAss4gnUVlH6ErG2TCkfQYvg94GqgvKGbxkspclGK7c68o6r7OtVXVtp1o6PkQX1UeYGE3n5fwqdaN3fWW-JwRjRW5v2569rCmDRb5TZFcm-lBUxAjzpyv94/s1600/google-48.png" /></a></td>
</tr></table>
</div>
<style>
.rssbuttontable
{
border: 1px solid #E6E6E6;
background: #FFDCB1;
float: center;
width: 270px;
margin-left:10px;
padding: 5px 5px 5px 5px;
border-radius: 5px;
-moz-border-radius: 5px;
height: 35px;
float: left;
display: inline;
margin-top:5px;
margin-bottom:5px;
}
input.Subscriberssbutton
{
background:-moz-linear-gradient(top,#F88017 0%,#FF6600 100%); background:-webkit-gradient(linear,left top,left bottom,from(#F88017),to(#FF6600));
border: 1px solid #FF6600;
text-transform: none;
font:bold 13px arial;
color: #fff;
height: 30px;
padding: 4px 2px 5px 2px;
margin: 0px 0 0x 0px;
border-radius: 5px;
-moz-border-radius: 5px;
-webkit-border-radius: 5px;
cursor:pointer;
display: inline;
}
</style>
<table class="rssbuttontable">
<tr>
<td>
<a rel="nofollow" href="http://feeds.feedburner.com/mybloggertips"><img src="http://feeds.feedburner.com/~fc/mybloggertips?bg=FF6600&fg=444444&anim=1" height="26" width="88" style="border:0" alt="" />
</a>
</td>
<td>
<input value="Subscribe to Get Updates" class="Subscriberssbutton" type="button" onclick="window.open('http://feedburner.google.com/fb/a/mailverify?uri=mybloggertips', 'popupwindow', 'scrollbars=yes,width=650,height=570');return true" /></td></tr></table>
4. Before saving you need to replace some values with your own. Process to next step.
Step 2: Add your Own values!
Replace:- http://www.facebook.com/pages/My-Blogger-Tips/220561111314693 with your facebook fanpage. (If you don't have one, create it here)
- http://twitter.com/mybloggertips with your twitter page.
- http://feeds.feedburner.com/mybloggertips with your feedburner link.
- https://plus.google.com/110875602250977569192/posts with your Google + page.
- mybloggertips (from the lower part of the code above) with your feedburner id. It appears 3 times, change 'em all.
Related Posts Widget for Blogger
I have discussed before about the importance of providing various navigational aids for your reader, like a list of recent posts or a list of categories. A list of related posts is another important feature that should be implemented in each and every blog.
The longer you keep the visitors on your blog, the better. When a visitor reads a post on a particular category, it is natural to assume that he will probably be interested in other posts under the same category. This will improve the page visits and the length of the time a visitor spends on your blog.
I have discussed about the importance of tags in one of my previous posts Why should I tag my posts? In addition to the benefits discussed, tags help to extract a list of related posts for your current post. I have tried a few widgets for related posts available for free on the net. I have listed them below. Feel free to explore further on the respective sites:
1. Hoctro’s Place: This seems to be the starting point for others, who came out with few modifications. Even though there are some enhancements from others, which I have discussed below, I still like Hoctro’s version. It requires the code to be copied to just one location. It comes in handy as a widget. You just need to modify the default URL to your blog’s URL. If you like to set the maximum number of posts to be displayed, then there is an option to change this.
2. Jackbook.com: This is a slightly modified version from Hoctro’s. The advantage here is you need not modify the code to point to your blog. The process is already automated. Jackbook also overcomes one drawback in Hoctro’s version, which displays the current article also under the related posts. Another change is that the related posts will be displayed only on the item page and not on the home page. In Hoctro’s version, you could choose to do both. If you are not familiar with HTML, then I would recommend Jackbook’s version, as it is very simple to install.
3. Purplemoggy: This is a bit difficult compared to the above two, as it requires the code to be copied/ modified at a few places. I tried once, but it didn’t work for me. I am not sure why it is so. But, you can try to see if this works for you.
The longer you keep the visitors on your blog, the better. When a visitor reads a post on a particular category, it is natural to assume that he will probably be interested in other posts under the same category. This will improve the page visits and the length of the time a visitor spends on your blog.
I have discussed about the importance of tags in one of my previous posts Why should I tag my posts? In addition to the benefits discussed, tags help to extract a list of related posts for your current post. I have tried a few widgets for related posts available for free on the net. I have listed them below. Feel free to explore further on the respective sites:
1. Hoctro’s Place: This seems to be the starting point for others, who came out with few modifications. Even though there are some enhancements from others, which I have discussed below, I still like Hoctro’s version. It requires the code to be copied to just one location. It comes in handy as a widget. You just need to modify the default URL to your blog’s URL. If you like to set the maximum number of posts to be displayed, then there is an option to change this.
2. Jackbook.com: This is a slightly modified version from Hoctro’s. The advantage here is you need not modify the code to point to your blog. The process is already automated. Jackbook also overcomes one drawback in Hoctro’s version, which displays the current article also under the related posts. Another change is that the related posts will be displayed only on the item page and not on the home page. In Hoctro’s version, you could choose to do both. If you are not familiar with HTML, then I would recommend Jackbook’s version, as it is very simple to install.
3. Purplemoggy: This is a bit difficult compared to the above two, as it requires the code to be copied/ modified at a few places. I tried once, but it didn’t work for me. I am not sure why it is so. But, you can try to see if this works for you.
Poll Widget for Blogger
There are several ways to interact with your readers. The comments section for each post is one way for your readers to interact with you. If you need to find your readers' response on a particular issue, then you could use a poll.
For example, you want to find out whether your readers like your template. Then, you can include a poll on your blog with a question "How would you rate my template?". You might want to give your readers choices like "Very Good, Good, Average, Poor, Very Poor". You will get some useful information for you to take a decision.
Blogger has a standard Poll widget included as a Page element. It is quite easy and intuitive to install this widget. I won't call this a Blogger Hack. This post is mainly intended for new bloggers coming on to the Blogger platform. If you are already familiar with installing page elements, you may not find anything useful.
For example, you want to find out whether your readers like your template. Then, you can include a poll on your blog with a question "How would you rate my template?". You might want to give your readers choices like "Very Good, Good, Average, Poor, Very Poor". You will get some useful information for you to take a decision.
Blogger has a standard Poll widget included as a Page element. It is quite easy and intuitive to install this widget. I won't call this a Blogger Hack. This post is mainly intended for new bloggers coming on to the Blogger platform. If you are already familiar with installing page elements, you may not find anything useful.
- Log in to your Blogger account.
- Click on the “Layout” link just below your blog name. This will take you to the “Page Elements” tab.
- Click on the “Add a Page Element” link at the section where you want to include the poll question. You can include it in the sidebar or just below the post.
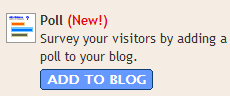
- In the Page Elements pop-up window, you will find the page element “Poll” on top of the window.
- Click the “Add to Blog” button. This will open the "Create a Poll" window for you.
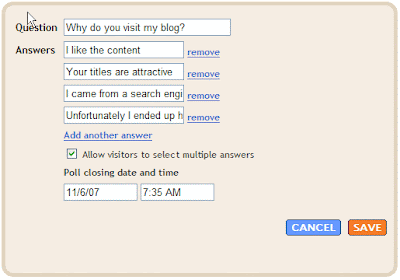
- Type in the question for your readers. Add the choices, one of which your readers will choose as answer. You could add more options by clicking on "Add another answer" or remove some options by clicking on "remove".
- By default, your reader can choose only one answer. If you want to allow your reader to choose multiple answers, then click the check box "Allow visitors to select multiple answers"
- You could set the closing date of the poll; the default is one week.
- Click on “Save”

How to install the tracking code?
The following steps will guide you through the simple installation procedure
How to install the Popular Posts Widget?
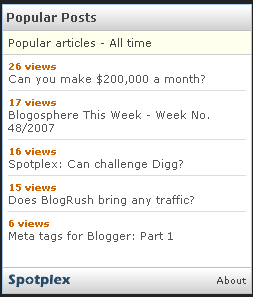
That’s it. You have completed the installation. Wait for some time to let Spotplex collect the data. Then, the popular posts widget will start showing your popular articles with the number of views for each post as shown below:
If you have any queries, feel free to leave a comment. I will respond as soon as possible. Please subscribe to my feed if you like this post
The following steps will guide you through the simple installation procedure
- Please click here to go to Spotplex home page.
- Once the home page is opened, please click on the rectangle near the top-right corner of the page with the title “Get your Spotplex code”
- Step 1: Register your blog
- Type your blog address
- Click on the button “Get my Spotplex code”
- Step 2: Blog information
- The title will automatically be retrieved. If you want to change it, then do so.
- Write a simple description for your blog
- Select the categories, maximum of 3
- Select your blog’s language
- Type in your e-mail address
- Check on the “I agree to the terms …”
- Click on the “Submit” button
- Step 3: Get your Spotplex code
- This is basically the credit to Spotplex. Choose whether you want to display an image or no image
- Then, select the blogging platform. If your blog is on Blogger, then choose Blogger
- Click the button “Install Spotplex Widget”
- This will open the login page for Blogger. Login with your account and install the Spotplex widget.
How to install the Popular Posts Widget?
- Click on the link “Get widget” just below the header
- Scope: Choose “Specific blog” to display the popular articles of your own blog
- Type: Type your blog url or the Spotplex code in the text box and then select “Popular Articles”
- Options:
- Choose the period for refreshing the popular articles. If you select “24 hours”, it will display your popular articles over the last 24 hours. If you select “All time”, it will display your all time popular posts
- Choose the width and height based on your sidebar dimensions
- Choose how many posts to display, 5, 10 or 15
- Click on “Get this widget”
- This will display the HTML code for the widget. Copy the code to clipboard.
- Login to your Blogger account
- On the dashboard, Click on “Layout”
- On the Page elements tab, click on “Add a page element”
- Under the page element “HTML/Javascript”, click "Add to Blog"
- Paste the code from Spotplex and save the page element
That’s it. You have completed the installation. Wait for some time to let Spotplex collect the data. Then, the popular posts widget will start showing your popular articles with the number of views for each post as shown below:

If you have any queries, feel free to leave a comment. I will respond as soon as possible. Please subscribe to my feed if you like this post
Top Commentators Widget For Blogger
You might have noticed the Top commentators widget in blogs powered by Wordpress. Sometimes, it is referred to as Best commentators widget. This post attempts to provide the same top commentators/ best commentators widget for Blogger/ Blogspot.When I did search for the top commentators widget for Blogger, I could get very little on the net. I found one useful resource that seemed to implement the top commentators widget for Blogger. But, unfortunately, it is written in a foreign language; I believe it is in Russian language. Here is the blog, in case, you are interested: Best Commentators Widget for Blogger.
- Go to Yahoo! Pipes home page by clicking here: Yahoo! Pipes
- Click on the "Sign In" link at the top right corner of the page
- Login with your Yahoo user id and password.
- Go to my Yahoo! Pipe "Top Commentators Widget for Blogger" by clicking here: Top Commentators Pipe
- Once you are on the Top Commentators Pipe page, click on the "Clone" link to make a copy for your blog.
- Once a copy is made, you will see the link "Edit Source". Click this.
- It will open the Pipes flow diagram for editing. At the top of the diagram, you will see a module called "Fetch Feed".
- You will change the feed to point to your blog. In the URL box in the "Fetch Feed" module, delete my blog's feed and type the following: http://yourblog.blogspot.com/feeds/comments/default?max-results=1000. The "yourblog.blogspot.com" has to be replaced by your blog's URL.
- Once you have typed the address as shown above, click on the "Save" button at the top right.
- Click on the "Run Pipe ..." button at the top middle. This will open another window with the results of your pipe. If you have done everything right, it should display the list of your commentators with the number of comments in brackets.
- Click on the "More Options" button. This will open a drop-down list; click on the "Get as RSS" option.
- This will open your feed for the top commentators list. Copy the feed address from the browser's address field. This should look some thing like this: http://pipes.yahoo.com/pipes/pipe.run?_id=1324dbad8c99bdc922ba75fee8dab73c&_render=rss
- Now, login to your Blogger account.
- Create a feed widget with the feed url you have just copied in step 12. If you are not sure how to create a feed widget, read my post on Recent Posts Widget for Blogger. You just have to follow the same steps as noted in that post. For the feed url, just use the one you have copied from the browser in step 12 here.
- Name the widget as "Top Commentators".
I know that this is a bit technical and you may encounter some problems along the way. Feel free to shoot your questions here. I will respond to them as quickly as possible. Please subscribe to my feed if you like this post.
Top Commentators Widget for Blogger: Update
I wrote a detailed step-by-step instruction to install the top commentators widget for Blogger/ Blogspot about two months ago. The widget was based on a feed from Yahoo Pipes. Since then, this remains as the most popular post from my blog. It has also attracted the most number of comments, positive and negative, and many trackbacks. In fact, the pipe did work very well except for some minor bugs. In this post, I have attempted to address some of the issues, thanks to some excellent work from other fellow bloggers.
Problem #1
The RSS feed did not work properly, as Blogger’s default feed widget tried to sort the feed according to the date. This has disrupted the already sorted version from Pipes and we had duplicate names and names that are not properly sorted. This has been pointed out by CyberPenguin in his/ her post The Top Commenters Feature Glitch Needs A Fix! Will You Be The One To Save The Day?!.
The Solution
This problem has now been resolved and I should thank two bloggers who came out with similar solution to this problem. These bloggers have come out with a Javascript code, which requires just one-step for you to install the top commentators widget in Blogger. Here are the links to the posts:
Problem #2
Some readers have asked about how to remove their own comments from the top commentators list. In fact, my original pipe did have a filter to remove the author’s name from the list. But, strangely, when you clone the pipe this filter is not available any more.
The Solution
I thought of writing a post on this, but BloggerBuster is quick enough to complete this in his blog. So, I will redirect you to his post to learn how to remove your name from the list:
Problem #3
Many readers have highlighted that the top commentators list is just linking back to the last comment made by that particular person. They felt that it would be nice if we could link to the commentator’s blog/ website instead.
The Solution
Unfortunately, there is no solution to this problem yet. Blogger does not provide the commentator’s blog/ web site URL in the RSS feed and hence we could not resolve this problem. But, let us see if Google will notice this and give us a way to work around. Until then, just be content with the names.
Finally, thanks to all the bloggers who made the effort to feedback, comment and improve the top commentators widget. Please subscribe to my feed if you like this post
Problem #1
The RSS feed did not work properly, as Blogger’s default feed widget tried to sort the feed according to the date. This has disrupted the already sorted version from Pipes and we had duplicate names and names that are not properly sorted. This has been pointed out by CyberPenguin in his/ her post The Top Commenters Feature Glitch Needs A Fix! Will You Be The One To Save The Day?!.
The Solution
This problem has now been resolved and I should thank two bloggers who came out with similar solution to this problem. These bloggers have come out with a Javascript code, which requires just one-step for you to install the top commentators widget in Blogger. Here are the links to the posts:
- Top Commentators For a Blogger Blog from GoogleSystem
- Top Commenter's Widget for Blogger Blogs! from BloggerBuster
Problem #2
Some readers have asked about how to remove their own comments from the top commentators list. In fact, my original pipe did have a filter to remove the author’s name from the list. But, strangely, when you clone the pipe this filter is not available any more.
The Solution
I thought of writing a post on this, but BloggerBuster is quick enough to complete this in his blog. So, I will redirect you to his post to learn how to remove your name from the list:
- Removing your name from the Top Commenters Widget
Problem #3
Many readers have highlighted that the top commentators list is just linking back to the last comment made by that particular person. They felt that it would be nice if we could link to the commentator’s blog/ website instead.
The Solution
Unfortunately, there is no solution to this problem yet. Blogger does not provide the commentator’s blog/ web site URL in the RSS feed and hence we could not resolve this problem. But, let us see if Google will notice this and give us a way to work around. Until then, just be content with the names.
Finally, thanks to all the bloggers who made the effort to feedback, comment and improve the top commentators widget. Please subscribe to my feed if you like this post
Statistics Widget for Blogger
 Here is my latest widget for Blogger/ Blogspot; I am going to call it Statistics Widget for Blogger. I have noticed a few sites displaying blog statistics like, total number of posts, total number of comments, total words in posts, total words in comments and similar data on their sidebar. I thought of coming out with a similar widget for Blogger.
What is Statistics Widget for Blogger?
Statistics Widget for Blogger will display the total number of posts and total number of comments on your blog. As of now, I have included only these two data for display. I do not see any value in displaying the total words in posts and total words in comments. I find them meaningless. If you are interested to display the total number of posts and total number of comments on your blog, please follow the instructions below.
Instructions to install Statistics Widget for Blogger
- Log in to your Blogger account
- On your Blogger Dashboard, click on the "Layout" link

- This will take you to the "Page Elements" tab. Decide where you want to insert the statistics widget and click on the "Add a Gadget" link accordingly.
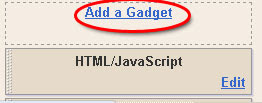
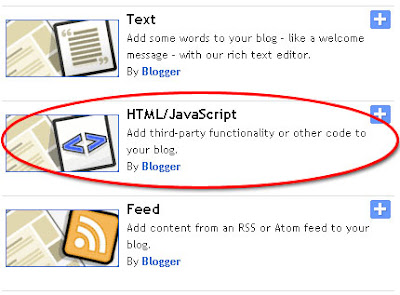
- Scroll down the list and find "HTML/ Javascript" and click on the "+" button
- This will open the "Configure HTML/ Javascript" window. In the title section, please type "Blog Statistics" or "Blog Information" or "Blog Data" or any other title as you may wish
- In the content section, please copy & paste the following code:<script style="text/javascript">
function numberOfPosts(json) {
document.write('Total Posts: <b>' + json.feed.openSearch$totalResults.$t + '</b><br>');
}
function numberOfComments(json) {
document.write('Total Comments: <b>' + json.feed.openSearch$totalResults.$t + '</b><br>');
}
</script>
<ul><li><script src="http://yourblog.blogspot.com/feeds/posts/default?alt=json-in-script&callback=numberOfPosts"></script></li>
<li><script src="http://yourblog.blogspot.com/feeds/comments/default?alt=json-in-script&callback=numberOfComments"></script></li></ul>
<span style="font-size:75%;"><a href="http://assessmyblog.blogspot.com/" target="_blank">Widgets for Blogger</a></span> - Remember to replace the text in bold "yourblog" with your blog address. Take note to replace it in two locations.
- Your window should look like the image below.

- I have a link back to my blog at the bottom. You are free to remove the credit, if you don't like it
- Click on "Save" button at the bottom right hand corner


That's it. You have created a widget to display the number of posts and number of comments on your blog. Please contact me if you have any doubts or you face any problems with the widget.
Please subscribe to my feed if you like this post
Recent Droppers Widget for Blogger
 If you are using Entrecard for building up your traffic, then this widget is for you. I am going to call this as Recent Droppers widget for Blogger/ Blogspot. You may call this as Latest Droppers widget or Entrecard Droppers widget or as you may wish.
 The widget is meant to display the links of recent droppers from Entrecard on your sidebar. This list will be a dynamic one and will change as entrecarders drop into your Entrecard widget. The idea is to reward all your droppers for a short period of time with a link to their blog. Now, I will explain how to install the widget. It is going to be very simple.
How to install the widget?
- Log in to your Entrecard account
- On the top right hand corner of your Dashboard, look for the orange colour feed button

- Click on the feed button
- This will open a new window. Look at the address bar in your browser window. The address should look like "http://entrecard.com/feeds/inbox/XXXXXXXXXX/rss2.0". Copy the address; we need to use this later in Blogger to create the widget
- Now, log in to your Blogger account
- On your Blogger Dashboard, click on the "Layout" link
- This will take you to the "Page Elements" tab. Decide where you want to insert the recent droppers widget and click on the "Add a Gadget" link accordingly.
- Scroll down the list, find a gadget titled "Feed" and click on the "+" button

- This will open the "Configure Feed" window. Here, you need to paste the URL copied from Entrecard (Refer to step 4). Click on the "Continue" button

- If you have pasted the feed URL correctly, you should see a prview of your recent droppers in the window now

- Blogger allows you to display a maximum of 5 droppers. If you want to display less than 5 links, select the number accordingly. Once you are satisfied, click "Save"


That completes the installation of your recent Entrecard droppers widget. Feel free to post your queries here, if you have any. Please subscribe to my feed if you like this post
widget for Blogger
Widgets for Blogger
Top Droppers Widget for Blogger
Monday, Jan 01, 2012
 In the previous post, we learnt how to install the Recent Droppers widget for Blogger. In this post, I am going to cover the Top Droppers widget for Blogger.
The Top droppers widget is meant to display the links of top droppers from Entrecard on your sidebar. While recent droppers widget will reward every dropper for a short period of time, the top droppers widget will reward only bloggers who consistently drops on you. If you have a good blog, then the droppers will fight hard to get a link from you. In return, you might get regular droppers.
Now, we will see how to install the Top Droppers Widget for Blogger/ Blogspot. If you have followed my instructions to install the Recent Droppers widget, you will find the instructions here very similar.
How to install the widget?
- Log in to your Entrecard account
- Click on the "Statistics" button, located on the top menu.
- Scroll down the Statistics page to a section titled "Top card droppers". You will see an orange colour RSS button besides the title. Click on the feed button.

- This will open a new window. Look at the address bar in your browser window. The address should look like "http://entrecard.com/feeds/top_droppers/XXXXXXXXXX/rss2.0". Copy the address; we need to use this later in Blogger to create the widget
- Now, log in to your Blogger account
- On your Blogger Dashboard, click on the "Layout" link
- This will take you to the "Page Elements" tab. Decide where you want to insert the recent droppers widget and click on the "Add a Gadget" link accordingly.
- Scroll down the list, find a gadget titled "Feed" and click on the "+" button
- This will open the "Configure Feed" window. Here, you need to paste the URL copied from Entrecard (Refer to step 4). Click on the "Continue" button
- If you have pasted the feed URL correctly, you should see a prview of your top droppers in the window now
- Blogger allows you to display a maximum of 5 droppers. If you want to display less than 5 links, select the number accordingly. Once you are satisfied, click "Save"


That completes the installation of your Top Entrecard droppers widget. Feel free to post your queries here, if you have any. Please subscribe to my feed if you like this post
Subscribe to:
Posts (Atom)


