 |
 |
Friday, February 17, 2012
How to install the tracking code?
How to install the tracking code?
The following steps will guide you through the simple installation procedure
How to install the Popular Posts Widget?
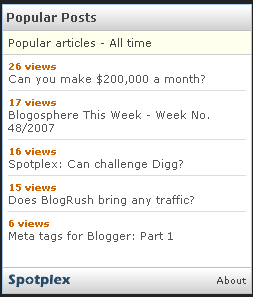
That’s it. You have completed the installation. Wait for some time to let Spotplex collect the data. Then, the popular posts widget will start showing your popular articles with the number of views for each post as shown below:
If you have any queries, feel free to leave a comment. I will respond as soon as possible. Please subscribe to my feed if you like this post
The following steps will guide you through the simple installation procedure
- Please click here to go to Spotplex home page.
- Once the home page is opened, please click on the rectangle near the top-right corner of the page with the title “Get your Spotplex code”
- Step 1: Register your blog
- Type your blog address
- Click on the button “Get my Spotplex code”
- Step 2: Blog information
- The title will automatically be retrieved. If you want to change it, then do so.
- Write a simple description for your blog
- Select the categories, maximum of 3
- Select your blog’s language
- Type in your e-mail address
- Check on the “I agree to the terms …”
- Click on the “Submit” button
- Step 3: Get your Spotplex code
- This is basically the credit to Spotplex. Choose whether you want to display an image or no image
- Then, select the blogging platform. If your blog is on Blogger, then choose Blogger
- Click the button “Install Spotplex Widget”
- This will open the login page for Blogger. Login with your account and install the Spotplex widget.
How to install the Popular Posts Widget?
- Click on the link “Get widget” just below the header
- Scope: Choose “Specific blog” to display the popular articles of your own blog
- Type: Type your blog url or the Spotplex code in the text box and then select “Popular Articles”
- Options:
- Choose the period for refreshing the popular articles. If you select “24 hours”, it will display your popular articles over the last 24 hours. If you select “All time”, it will display your all time popular posts
- Choose the width and height based on your sidebar dimensions
- Choose how many posts to display, 5, 10 or 15
- Click on “Get this widget”
- This will display the HTML code for the widget. Copy the code to clipboard.
- Login to your Blogger account
- On the dashboard, Click on “Layout”
- On the Page elements tab, click on “Add a page element”
- Under the page element “HTML/Javascript”, click "Add to Blog"
- Paste the code from Spotplex and save the page element
That’s it. You have completed the installation. Wait for some time to let Spotplex collect the data. Then, the popular posts widget will start showing your popular articles with the number of views for each post as shown below:

If you have any queries, feel free to leave a comment. I will respond as soon as possible. Please subscribe to my feed if you like this post
 About Author
Subscribe to:
Post Comments (Atom)


0 Responses to “How to install the tracking code?”
Post a Comment