 |
 |
Showing posts with label CSS. Show all posts
Showing posts with label CSS. Show all posts
Saturday, August 25, 2012
 Continuing
from my recent post about the Page hack in Blogger, I have been asked
by some of my readers to implement the same thing inside a Post. Well
some might why is it needed in the first place? , the reasoning behind
that is to make your Post look a little short (Even when they are not).
The method I will be employing is in no ways a clean one and will
require to include a JavaScript file individually in each post followed
by a full rearrangement (Just Copy-Paste) of the contents.
Saturday, August 25, 2012 1

Thursday, April 12, 2012
 Cascading Style Sheet is the heart of designers and with latest web technology such as CSS3, designing has become even more interesting. Thanks to CSS3 attribute value selectors, now you can style any file extension or tag.
I am using CSS3 attribute selector property in this tutorial to add Icons to hyperlinks. Previously we had to use JavaScript to add an icon next to the hyperlink on your blogger blog or website but now you can do it easily using CSS3. The icon will depend upon the type of file extension. If your link is pointing to a mp3 file then it will add a music symbol next to the link and so on. See the demo which shows 13 file format links,
How To Add Icons to Hyperlinks in Blogger?
- Go To Blogger > Design> Edit HTML
- Check the "Expand Widget Templates" Box
- Search for this,
]]></b:skin>4. Just above it paste the code given below,
/*--------- MBT Hyperlink Icons ----------*/
a[href*='.js'] {
background: url(https://blogger.googleusercontent.com/img/b/R29vZ2xl/AVvXsEiVQgnVnCoHedbZhKs3krmDYBnrD1QBKX4RfZyPiNj0P698lpVjwBunNWge7e3W1wQ2H3nN_XaEePTbEa6N5PNwcQNJEnutM6KM3ql0QSP1lPszH4w5UcNYLU9axQq2x4416EK_3Jt9YVU/s400/file_js.png) no-repeat 0 0;
padding:7px 0 0 25px;
}
a[href*='.gif'] {
background: url(https://blogger.googleusercontent.com/img/b/R29vZ2xl/AVvXsEgtgr7pvNmLvCp6-KdSwECGWaFv8GCVRW1yS5axbpAbMNnuG8p_tRcfSo1c8iK_ETvwhO5AEHU-07gyNExsErG3Ut8oyMi8QeXiTykNlka5TOnq5RepOSslOis5jslHCGV_Imqh1VmWdDc/s400/file_gif.png) no-repeat 0 0;
padding:7px 0 0 25px;
}
a[href*='.doc'] {
background: url(https://blogger.googleusercontent.com/img/b/R29vZ2xl/AVvXsEjfBxBAM-610D8oHPSUPtZj96pz-bl1jVg2t-GbigpTX63kMPqdz8a8FcvKQjif1odgv80EVoOfOilgqLyiA_Ap25jBxi_fFVmQDjBff_7Jiq5N3hRcwYa8xcl9yKXGMcdFfnrfHQHiVvg/s400/file_doc.png) no-repeat 0px 0px;
padding:7px 0 0 25px;
}
a[href*='.rar'] {
background: url(https://blogger.googleusercontent.com/img/b/R29vZ2xl/AVvXsEgxiMPh1FhwC8_2IxwgRxfkwHGfRnH9H5IxuJHV353K_5WaH2amxmt2hI4Luaj8SrlFSpTswV5ksgUxtcRgPFf880_SHIXNOFl3eyfa9JQZUg7eZjFLCPQzFseNdkyMkSGAehF_Ato0pYU/s400/file_rar.png) no-repeat 0px 0px;padding:7px 0 0 25px;
}
a[href*='.zip'] {
background: url(https://blogger.googleusercontent.com/img/b/R29vZ2xl/AVvXsEhLsnQW7HV2K5Ko7mxrD6xiZUHhNgDCbvRDD6R7HtTMMmb-HUz6vT7saLNtzAEjQtU1GPCUxO93WP_jiFozyt0-KypCf5LwJaFPtNhWoghv9AT_tGuII0D7xFiMN-WYUEdfD-EFbd-IqLk/s400/file_zip.png) no-repeat 0px 0px;
padding:7px 0 0 25px;
}
a[href*='.mp4'] {
background: url(https://blogger.googleusercontent.com/img/b/R29vZ2xl/AVvXsEjVkjOF7dJWx_E4kp5vImPmKiah0RhK9SHChnO4JpOZYlaK96LBB5LV2OZuU7m55R3gV5gA5058387cSVyv9T8hoD74XbBlVgmVNAxShlgSRUwLjKDQPmoLCqXCnEi5zN0GU8c5sLgJdlA/s400/file_mp4.png) no-repeat 0px 0px;
padding:7px 0 0 25px;
}
a[href*='.php'] {
background: url(https://blogger.googleusercontent.com/img/b/R29vZ2xl/AVvXsEj2x5e3FsoQwxvcD3UknBDWxmXvlJGHRpQGmceWpMhmJM8_vbDeptKm5fZM676kA5UFLajHz-q_UAK8tZ1EVwWlTensyBHjlSQrHXm-3jXoiqkx9tJWLnK9YxVvuqkKRoSkbhvvXgNILFY/s400/file_php.png) no-repeat 0px 0px;
padding:7px 0 0 25px;
}
a[href*='.xml'] {
background: url(https://blogger.googleusercontent.com/img/b/R29vZ2xl/AVvXsEgWtAUpJvv_iCFQg_IXl_1qzzZId8eL2e7AgG0pDOGrZQaO_WsJApEF8ojHu_WzsFYiUl5SvNNtVxKoshEMnJfE6FbznFOC59Iie2aCrkrlJBWOVeoJdcfunjG6Nld7qfJQ67mPP0TVK0o/s400/file_xml.png) no-repeat 0px 0px;
padding:7px 0 0 25px;
}
a[href*='.pdf'] {
background: url(https://blogger.googleusercontent.com/img/b/R29vZ2xl/AVvXsEj0MbSQvMkObBhhOf1lMY1AEXJnH-O4GfP-Qs2qGL6u3sGIbz7I9hZ6WCQSCid7at07S_O0opIk6NVtQv47IKu8gwq8YyBfl7LqcclglhRVM34P2TKixqUjI1vjw02TfcKpPRIKqYhZ9fw/s400/file_pdf.png) no-repeat 0px 0px;
padding:7px 0 0 25px;
}
a[href*='.xls'] {
background: url(https://blogger.googleusercontent.com/img/b/R29vZ2xl/AVvXsEjrYm3oHJYMH-nUdFEX1O-JVbFJfnw4si2kCnNgrFtNvj_UcGCmFhfEujbZC8-pr8lhNNN5jJ63hKLHie1eEZ7lT-rBXSKVDMX305kaFsNivXbHZJDEyUBE7ZG5em0ZMYwK31hWSjwvpEA/s400/file_xls.png) no-repeat 0px 0px;
padding:7px 0 0 25px;
}
a[href*='.mpg'] {
background: url(https://blogger.googleusercontent.com/img/b/R29vZ2xl/AVvXsEgSpKXkW2m03MGaRHVTvV5YSAWNYN79BU-zXRnNP3VnjJfCyH0eWvcDZmR-9-9ANhPC6YibNTt136UaCI0YANxTg4n8Elm7dAbwug5g6zryWsoUt8hOjBZJfMsGEt45IlXCSAWSy91ILig/s400/file_mpg.png) no-repeat 0px 0px;
padding:7px 0 0 25px;
}
a[href*='.bmp'] {
background: url(https://blogger.googleusercontent.com/img/b/R29vZ2xl/AVvXsEht_PCPpFcHyetlwCHHBsyr1-T4mcnGHELRKh3NFESCO8P7PP39e1zZNwat7gWU7M4tUxTcsGWcVI47lT-bGp0bZfcrsKFttT2z_RZQ-wh-E9Zm9lup_kcIfn12woBzRewBiphXJivfPJU/s400/file_bmp.png) no-repeat 0px 0px;
padding:7px 0 0 25px;
}
a[href*='.avi'] {
background: url(https://blogger.googleusercontent.com/img/b/R29vZ2xl/AVvXsEjoEWRg8A8qnyzUGIikFWAkto3fswB3vH_CMqPGJETLUuQlkqADp2hwgug45aDgb4U1kqpw0Qv-xpwk_r9lwlomUlMWs_zKEhepv6Z3vA8adEyrnPcc_ppMaEW44LacVniDTI6AR2OTHPc/s400/file_avi.png) no-repeat 0px 0px;
padding:7px 0 0 25px;
}
a[href*='.mp3'] {
background: url(https://blogger.googleusercontent.com/img/b/R29vZ2xl/AVvXsEho1_HEIqtDhFVSE3zr157ayv2Gy8v1WcggPNmUTyrwLlWJJhv5r0Z0Hyr6LYGIFhaeGGQFClwVlWFFfuXx4MZjh1OIqQInEzDq1oMbYnzZtL1JkUge_SLTUnUYKG0XVASv1AOJR6v2n4g/s400/audio_alt.png) no-repeat 0px 0px;
padding:7px 0 0 25px;
}
a[href*='mailto'] {
background: url(https://blogger.googleusercontent.com/img/b/R29vZ2xl/AVvXsEiKaxAOWUAgFJ_QWciFFgX3OQYxMe1LqIcDWlcXEf6KLvKyoBvyYdUpoi82ctHr9VgYAutBOOUH6Jp-eQqbkvvbfJSKd-8AByBVi16CJYNvscwWDDYu6vmOAYVAaxUh-tKC4WyMap-24_Y/s400/e_mail.png) no-repeat 0px 0px;
padding:0 0 0 25px;
}
4. Save your templates and you are done!
How it works?
The icons appear when the file extension is detected in the link. For Example if I add a link to pdf file like this,<a href="http://www.mybloggertricks.com/xyz.pdf">Download E-book</a>Then the link will appear like this when I publish it,

Now add any Ebook or any image link in your blogger posts, sidebars or footer anywhere you want and you will find cute icons appearing next to the link. You can also use icons of your choice by simply changing the icon image links in the code above. The code is really easy to edit and I hope after having read so much of our tutorials you can at least edit this code. Have fun and let me know if you faced any problem. Enjoy! :)
Thursday, April 12, 2012 0
 Highlighting and customizing author comments differently from visitor comments is a very important step that you must take as soon as possible because this will make author comments more prominent to the visitors and will therefore encourage visitors to take part in the discussion and better communicate with the author. The blogger comment block consists of three important sections which are,
- Comment-author
- Comment-body
- Comment-footer
Highlight and Customize Comments in Blogger
- Go To Blogger > Design > Edit HTML
- Backup your template
- Check "Expand widget templates" Box
- Search for this.
]]></b:skin>5. Just above it paste the CSS code below,
.mbt-comment-body {Make these changes:
background: #FFFFFF;
color: #008000;
border: 1px solid #008000;
margin:0;
padding:0 0 0 10px;
width:520px;
}
- To Change the background color of author comments change #FFFFFF
- To change font color change #008000
- To change border size change 1px, to change border style change to solid, dashed or dotted and to change the color of the border change #008000
- To change the width of the comment body change 520px
6. Next search carefully for this code in your template,
Tip: Press Crtl +F and search for one line at a time
<data:commentPostedByMsg/>7. Replace it with the following code,
</dt>
<dd class='comment-body'>
<b:if cond='data:comment.isDeleted'>
<span class='deleted-comment'><data:comment.body/></span>
<b:else/>
<p><data:comment.body/></p>
</b:if>
</dd>
<data:commentPostedByMsg/>8. Save your template and you are done!
</dt>
<b:if cond='data:comment.author == data:post.author'>
<dd class='mbt-comment-body'>
<p><data:comment.body/></p>
</dd>
<b:else/>
<dd class='comment-body'>
<b:if cond='data:comment.isDeleted'>
<span class='deleted-comment'><data:comment.body/></span>
<b:else/>
<p><data:comment.body/></p>
</b:if>
</dd>
</b:if>
Visit your blogs and see that the author comments now look something like this,

Let me know if you faced any problem. Would be a pleasure helping you. In my next post I will share several ways of customizing author comments. Have Fun! :)
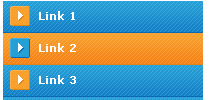
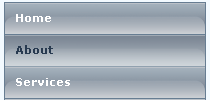
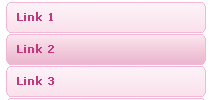
 After the release of 30+ Horizontal Navigation Menus, we head forward to a beautiful collection of some of the best looking vertical navigation menus that will put soul to anyone’s weblog or website! I have modified the codes made by Christopher and Highdots and have made them compatible with Blogger. I hope this collection will be of interest to most of you simply because these navigation menu tabs can easily be installed, customized and multiplied! I hope it will be of great help to new designers :>
How To Add A Vertical Navigation CSS Menu To Blogger?
Well the process is as simply as it can be. Simply follow these steps carefully,- Go To Blogger > Layout > Edit HTML
- Back-up your template
All Navigation Menus below uses two pieces of codes. One is The CSS code which is responsible for the look and feel of the menus and the second is the HTML code which is responsible for positioning the menus. So lets know where to add each code!
3. Paste the CSS code for your selected Menu just above ]]></b:skin>4. For the HTML code there can be two positions either your right sidebar or left sidebar. Depends how many columns you have.
- If you have a right sidebar then paste the HTML code just below <div id='sidebar-wrapper'> or this <div id='sidebar-wrapper-right'>
- If you have a left sidebar then paste the HTML code just below <div id='sidebar-wrapper-left'>
Note:- Since most templates use different coding therefore if you could not find the above codes then don’t worry simply share your blog URL in the comment box and I will view your template coding and will tell you instantly which code to search for!
5. Finally save your template and see a beautiful Navigation Menu hanging on your sidebar :DEditing The Links In The Navigation Menu
To change the Tab Menu Links and Titles, simply edit this bolded part of the HTML code,<li><a href="#1" >Link 1</a></li>
<li><a href="#2" >Link 2</a></li>
<li><a href="#3" >Link 3</a></li>
<li><a href="#4" >Link 4</a></li>
<li><a href="#5" >Link5</a></li>
Replace #1, #2, #3 etc with your Page Links/URL and replace Link1, Link2, Link3 etc with your Page Titles. If you wish to add or delete a tab then simply add or delete this line from the HTML code,
<li><a href="#" >Link</a></li>
For Live Demo of Other Navigation Menus Simply use our HTML Editor and Copy and Paste the CSS and HTML code at right areas and then start playing with the code :>>
Navigation Menu #1

CSS CODE:
HTML CODE:
Navigation Menu #2

CSS Code:
HTML Code:
Navigation Menu #3
CSS Code:
HTML Code:
Navigation Menu #4

CSS Code:
HTML Code:
Navigation Menu #5

CSS Code:
HTML Code:
Navigation Menu #6

CSS Code:
HTML Code:
Navigation Menu #7
CSS Code:
HTML Code:
Navigation Menu #8

CSS Code:
HTML Code:
Navigation Menu #9

CSS Code:
HTML Code:
Navigation Menu #10
CSS Code:
HTML Code:
Navigation Menu #11
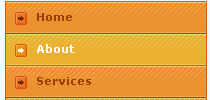
CSS Code:
HTML Code:
Navigation Menu #12

CSS Code:
HTML Code:
Navigation Menu #13

CSS Code:
HTML Code:
Navigation Menu #14

CSS Code:
HTML Code:
Navigation Menu #15

CSS Code:
HTML Code:
Navigation Menu #16
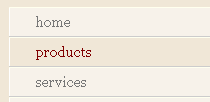
CSS Code:
HTML Code:
Navigation Menu #17

CSS Code:
HTML Code:
Navigation Menu #18

CSS Code:
HTML Code:
Navigation Menu #19

CSS Code:
HTML Code:
Navigation Menu #20

CSS Code:
HTML Code:
Navigation Menu #21

CSS Code:
HTML Code:
Navigation Menu #22

HTML Code:
Navigation Menu #23

CSS Code:
HTML Code:
Navigation Menu #24

CSS Code:
HTML Code:
Navigation Menu #25

CSS Code:
HTML Code:
That’s All!
Hope you have enjoyed the post. Feel free to ask any question related to these navigation menus. I am happy I fulfilled my promise of publishing this post :>
Subscribe to:
Posts (Atom)


