 |
 |
Showing posts with label FAQ. Show all posts
Showing posts with label FAQ. Show all posts
Thursday, April 12, 2012
 There are many people who still do not understand what a blog is or why is blogging so much expanding in the cyberspace. I feel all these people deserve the right to know what a Blog is and how can a Blog be created along with some other similar questions. So for those who just heard of a Blog from their friends, media or any other source, here is a short and precise illustrative tutorial to help you find answers to four important questions in most people’s mind.
- What is a Blog?
- How do I create a Blog?
- What is the advantage of blogging?
- What is Blogger or Wordpress?
What is a Blog?
A blog is nothing but an Online Notebook Diary. What do we write in a notebook diary? Of course stuff that we like and things that we feel important to be recorded and shared with our friends and family. A notebook diary can be based on any topic that you like for example you can write on your hobbies, activities, poems, songs, tutorials, pets, home and family, your personal thoughts etc. People will read your Online Notebook Diary on daily basis and will leave you a comment, suggestion or feedback.
If you write about your personal experiences in a notebook made up of papers, then your writings will reach only limited people around you but with an online diary like a Blog you speak to the world!
So in short a blog is your Personal website where you write and share things you like with millions of people out there who are eager to read what is cooking in your mind!
The video below will give you a more illustrative view of a Web Blog.
How do I create a Blog?
Creating a blog is absolutely free. There are many quality Blogging hosting services that you can choose to create a blog but the best among them is Blogger. I have created this blog with Blogger without even paying a penny! Want to know how? Watch this video to know how to create a blog in less than Five minutes!
What is the advantage of blogging?
You pay nothing Instead you Earn in $$ !! You earn by displaying advertisements on your Blog. People are earning from $100 to $100,000 monthly! I am not kidding an example is shoemoney.com and problogger.net
Plus you will make new friends in the Blogosphere and you earn respect in the eyes of thousands of people. You can become a celebrity! But all this with a little hard work and great patience.
And the best advantage which I have experienced is that you learn every second online! Your internet and computer skills will improve to an extreme edge and this is what the coming era demands from you. Every second on blogging is undoubtedly a new experience! I have learnt HMTL, CSS, XML and a bit of JavaScript without taking any classes. I learnt them all within a year of my blogging career and today I am able to design a quality blogger template in less than three hours MashAllah!
What is Blogger or Wordpress?
These are the major blogging platforms which help you create a free Blog. But if you are confused which one to start with then go for Blogger. It has many features which wordpress doesn’t have and the best part is that Blogger allows you to customize your template in any way you like by editing the CSS style sheet! So what are you looking? Start blogging now and build up a new cyber life. Best of luck!
To know in detail whether Blogger is better or WordPress then read this post –> Comparison Chart 2010 for WordPress Vs Blogger
Feel free to ask any question that is still troubling your mind. Take care :>Thursday, April 12, 2012 0
Friday, February 17, 2012
Change Favicon in Blogger Dynamic Views

Lots of Blogger users are shifting from their current templates to the new dynamic view templates and that not it, the strength is increasing day by day. Previously you learned How to Customize your Dynamic view templates. This tutorial is about how to change the favicon in dynamic views. Its very simple just follow the steps below
Change Favicon in Blogger Dynamic view templates
- Go to Blogger.
- Click on the Design tab of your Blog (the one having Dynamic Template enabled), your blog will open in template editor rather than the layout page. Copy your blog ID from the link in your address bar, as show below.
http://www.blogger.com/template-editor.g?blogID=0000000000000000000
3. Now Paste the Copied blog ID in the link below and visit that using your browser.
http://www.blogger.com/rearrange?blogID=0000000000000000000
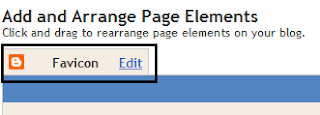
4. Now you will be able to see the Widgets/Gadgets layout page, Just below the "Add and Arrange Page Elements" you will find Favicon. Click edit next to the favicon. (shown in the picture below).
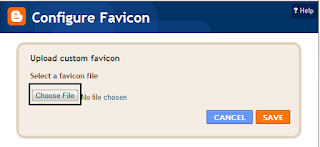
5. Now configure your favicon. Select an image less than 100 KB and it must be a square image.
Note: To change favicon for non dynamic view user
If you wish to share this tutorial (or any other tutorial) on your blog with your reader, you must put a link back to My Blogger Tips or else your blog will be reported to DMCA. You must respect copyrights.
Friday, February 17, 2012 0
How to install the tracking code?
The following steps will guide you through the simple installation procedure
How to install the Popular Posts Widget?
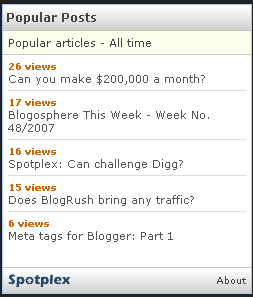
That’s it. You have completed the installation. Wait for some time to let Spotplex collect the data. Then, the popular posts widget will start showing your popular articles with the number of views for each post as shown below:
If you have any queries, feel free to leave a comment. I will respond as soon as possible. Please subscribe to my feed if you like this post
The following steps will guide you through the simple installation procedure
- Please click here to go to Spotplex home page.
- Once the home page is opened, please click on the rectangle near the top-right corner of the page with the title “Get your Spotplex code”
- Step 1: Register your blog
- Type your blog address
- Click on the button “Get my Spotplex code”
- Step 2: Blog information
- The title will automatically be retrieved. If you want to change it, then do so.
- Write a simple description for your blog
- Select the categories, maximum of 3
- Select your blog’s language
- Type in your e-mail address
- Check on the “I agree to the terms …”
- Click on the “Submit” button
- Step 3: Get your Spotplex code
- This is basically the credit to Spotplex. Choose whether you want to display an image or no image
- Then, select the blogging platform. If your blog is on Blogger, then choose Blogger
- Click the button “Install Spotplex Widget”
- This will open the login page for Blogger. Login with your account and install the Spotplex widget.
How to install the Popular Posts Widget?
- Click on the link “Get widget” just below the header
- Scope: Choose “Specific blog” to display the popular articles of your own blog
- Type: Type your blog url or the Spotplex code in the text box and then select “Popular Articles”
- Options:
- Choose the period for refreshing the popular articles. If you select “24 hours”, it will display your popular articles over the last 24 hours. If you select “All time”, it will display your all time popular posts
- Choose the width and height based on your sidebar dimensions
- Choose how many posts to display, 5, 10 or 15
- Click on “Get this widget”
- This will display the HTML code for the widget. Copy the code to clipboard.
- Login to your Blogger account
- On the dashboard, Click on “Layout”
- On the Page elements tab, click on “Add a page element”
- Under the page element “HTML/Javascript”, click "Add to Blog"
- Paste the code from Spotplex and save the page element
That’s it. You have completed the installation. Wait for some time to let Spotplex collect the data. Then, the popular posts widget will start showing your popular articles with the number of views for each post as shown below:

If you have any queries, feel free to leave a comment. I will respond as soon as possible. Please subscribe to my feed if you like this post
How to import and export blogs on Blogger?
The import and export features on Blogger give your content a whole new range of portability and freedom, allowing you to create copies of your own blogs as well as import them into other existing ones. Best of all-we've made this a very simple process!
Import as a New Blog
To import content as a brand new blog, click Create a Blog from your dashboard.
Then under Advanced Options, click the Import Blog Tool

Finally, choose the Blogger export file (.xml) from your hard drive and fill out the word verification. Click the Upload arrow and your new blog will be created instantly!
Import Into an Existing Blog
To import posts and comments into an already existing blog, start by clicking Import Blog from the existing blog's Settings | Basic tab. Note: Your template will not be affected by the imported content.Next, choose a Blogger export file (.xml) from your hard drive and fill out the word verification beneath. By default, all of your imported posts will remain unpublished until you publish them from your dashboard later. However, if you would rather have all posts published immediately, make sure to check the box next to Automatically publish all imported posts before you click Import Blog.
 If you did not choose to have your posts publish automatically, you will need to manually publish them from the Posting | Edit Posts tab before they will appear on the web. You can either publish all the posts at once by clicking Publish all imported posts, or publish individual posts by selecting them and then clicking Publish Selected.

Exporting Your blog
To export your blog, simply click Export Blog from the Settings | Basic tab. Finally, click the Export Blog button. You blog will be stored as a Blogger export file (.xml) file which can be kept as a backup on your hard drive or imported into another blog.
Note: Exported blogs are not deleted from your dashboard or Blogger.com
How to Delete a blog?
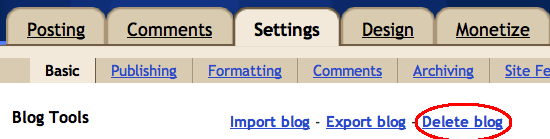 If you're using our upgraded user interface, click on the drop-down menu next to the gray Post List icon, go to Settings | Basic, and click on the "Other" section for the option to delete your blog.
If you've accidentally deleted your blog and want it back, you can restore your blog within a certain period of time after deletion. Let's say you have 5 blogs, and you've deleted one of them. Just go to your Dashboard, where your blogs are listed, and find the line at the bottom that says "Displaying 4 of 5 blogs - Show all." Click "Show all," and your deleted blog will appear in the list, with the option "Undelete this blog." Once you select that option, everything will be back to normal.
How do I create a title for my post?
First, make sure Titles are enabled by going to Settings | Formatting: Then, create a new post- you'll see the Title field:
 The default Blogger templates contain the tags necessary to display the titles you create. For information on how these title tags work, see this article.
y post?
How to create a Blogger account?
 On the following page you'll be prompted to create a Google Account. You can use your Google Account on other Google services. If you already have a Google Account perhaps from Gmail, Google Groups, or Orkut, please sign in first. After you've done that, you'll need to enter a display name and accept Blogger's Terms of Service.
Once you're done with this, you'll be prompted to Create a Blog and get started!
Subscribe to:
Posts (Atom)


