 |
 |
Friday, February 17, 2012
How to add Google +1 (plus one) button to blogger?

Google +1 sharing button is like Facebook like button, both have the same purpose i.e to show your friends that you recommend something that you found on web. Facebook shows the recommendations on the person's profile (who liked) while google +1 will be shown on the Google Search results.
This video would better explain how Google +1 Works:
How to Add Google +1 button to blogger posts
- Go to Dashboard > Design > Edit HTML and Back up your template
- Check the Expand Widget Templates checkbox on top right of the code window.

- Find the following code in your HTML:
<data:post.body/>
- Paste the +1 button code immediately below (after) it:
<!-- Google +1 button Start -->

<b:if cond='data:blog.pageType != "static_page"'>

<div style='float:left;padding:10px;'>

<script type="text/javascript" src="https://apis.google.com/js/plusone.js"></script>

<g:plusone expr:href="data:post.url" size="standard" count="true"></g:plusone>
</div>
</b:if>

button End -->

<!-- Google +1 button ends -->
Save your Template and you are done.
Further Customization
Google +1 for Blogger can be further customized:
- Select the size of button by replacing the value of size with a value from the table below.

Table by: bloggersentral.com - You can remove the count by replacing the value of count from true to false.
- If you want your Google +1 button under the blogger post title then you would have to paste the Google +1 button Code Before <data:post.body/>
- If you want to show your +1 Google Button on the right side , simply change float:left to float:right , add the code and save your template.
Friday, February 17, 2012 0
The Classic Subscribe widget for Blogger
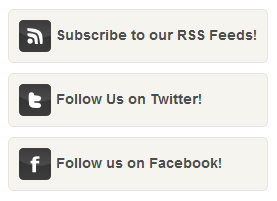
Live Demo
Step 1: Add the classic subscribe widget to Blogger Blogs?
- Go to Blogger >> Design.
- Add a Gadget.
- Select HTML/JavaScript and paste the following code in it:
<style>

/*  ---------My Blogger Tips Social Media Widget----------- */

.social-connect-widget{background:#F5F4EF;border:1px solid #E7E6DE;padding:10px; border-radius:5px; -moz-border-radius:5px;}
.social-connect-widget:hover{border:1px solid #CBCBC2;background:#FFF}
.social-connect-widget a{text-decoration:none;font-weight:bold;font-family:Arial,Helvetica,Sans-serif;color:#4B4D4E}
.social-connect-widget a:hover{text-decoration:underline;color:#F77C04}
.social-connect-widget img{vertical-align:middle;margin-right:5px;height:32px;width:32;}
</style>


<div class='social-connect-widget' style='margin-top:0px;margin-bottom:10px;'>
<a href='http://feeds.feedburner.com/USERNAME'><img alt='RSS Feed' src="https://blogger.googleusercontent.com/img/b/R29vZ2xl/AVvXsEgf_PQBOri9f2q0gs1_uQlOmqWLXGSCpw3Sp9IScyVmr0YlEV5Uiq_ozAkVlDPTKldDb_OCp8jdv8IRnbti25i6Xp2dLh5FRahlPfmUhvhKePClgkOpF6V-XlY6rf8LGTHaR0PVA-mwbuYM/s1600/rss.png"/></a><a href='http://feeds.feedburner.com/USERNAME'>Subscribe to our RSS Feeds!</a>
</div>

<div class='social-connect-widget' style='margin-bottom:10px;'>
<a href='http://twitter.com/USERNAME'><img alt='Follow Us on Twitter!' src="https://blogger.googleusercontent.com/img/b/R29vZ2xl/AVvXsEgeQw2sWrk2nDWDL9nmB9APvvqa7Dp-PG6igBeVvZKLeah1mdR3E7EbeziIZOZKMun3WiM3tcSfN4BQgLZcwXzkUaIOQ7LhTAfwiQ0_RfDFH1T45PidenQh8Fr1gNnZUgr9aDLbBLQkjKmJ/s1600/twitter.png" title='Follow Us on Twitter!'/></a><a href='http://twitter.com/USERNAME'>Follow Us on Twitter!</a>
</div>
<div class='social-connect-widget' style='margin-bottom:10px;'>
<a href='http://facebook.com/USERNAME'><img alt='Be Our Fan!' src="https://blogger.googleusercontent.com/img/b/R29vZ2xl/AVvXsEjjtVzhbi7Lz168SGxb_eNzmqWvRqWQq8z0sI0ujB_IfL2oSQPowDmIsnZ6iiN4OEZbA7MeQHS2KceYMCcC5Goj_EpigwuNMI4bElpMwt1S3XazFceu3YW3I2ZF5lnPD9lnbGCZ_wsffL5c/s1600/facebook.png' title='Be Our Fan"/></a><a href='http://facebook.com/USERNAME'>Follow us on Facebook!</a>
</div>
- Before saving, Proceed to the next step.
Step 2: Add your own values!
You need to replace the following with your own.- http://feeds.feedburner.com/USERNAME with your own Feedburner id.
- http://twitter.com/USERNAME with your own Twitter id.
- http://facebook.com/USERNAME with your own Facebook fan page link.
Save and you are done. :)
More Cool Widgets and Tips are on its way, Subscribe to stay tuned!
 If you enjoyed this post and wish to be informed whenever a new post is published, then make sure you Subscribe to get regular updates.





Magnetic Featured posts with Thumbnails Widget for Blogger Blogs
Featured Posts are basically some posts within your blog that you want to highlight to your readers, separately. It's kinda great way to direct your readers to a certain post that you wan't them to check out. The reason I designated the word "Magnetic" to this Gadget is that it has the capability to attract your readers' attention and deliberation and it would make your blog look more astonishing. So lets get to work and show you how to add the "Featured Posts widget" to your blogs.

(You can See the Demo below on this blog)
How to add Featured posts Widget to Blogger Blogs?
Follow these steps exactly as mentioned:- Go to Blogger.
- Design > Edit HTML.
- Expand Widget Templates.
- Find ]]></b:skin> and place the following CSS code just above it.
/*----------- My Blogger Tips Featured Posts -----------------*/
#mbtipsboxes{height:320px;overflow:hidden;margin:0px;position:relative;width:938px;background:#F2F1F1;border:8px solid #333; border-radius: 1px; -moz-border-radius: 1px; padding:5px 5px;}
#mbtipsboxes ul{ margin-left: 10px; padding: 0pt; position: relative; list-style-type: none; z-index: 1;  width: 100%; }
#mbtipsboxes ul li{ overflow: hidden; float: left; width: 228px; height: 295px; border-top:0px solid #333; margin-right:6px; padding:2px 0px 4px 0px;}
#mbtipsboxes ul li:hover{ border-bottom:1px solid #636363; }
#mbtipsboxes img{width:210px;height:210px; padding:2px; border: 0px solid #A3A3A3; border-radius:10px; -moz-border-radius:10px;  margin-top:0px;}
#mbtipsboxes img:hover{border: 0px solid #8B8B8B; }
.mbtipsbody img{float:center}
.mbtipsbody {position:relative;margin:0 5px 0 5px;width:170px;height:210px;display:inline;float:center;color:#c4c4c4}
.mbtipsbody h3{padding:5px 0;font-size:12px;font-weight:bold; font-family: verdana, sans-serif, arial; margin:0; text-align:center}
.mbtipsbody h3 a:link,.mbtipsbody h3 a:visited{color:#2F97FF;}
.mbtipsbody h3 a:hover{color:#c5c5c5}
.mbtipsbody p{margin:0; padding:0 0;color:#636363;font:10px normal verdana, sans-serif, Arial; text-align:center}
.Fadein3 img {
filter:alpha(opacity=80);
opacity: 0.8;
border:0;
}
.Fadein3:hover img {
filter:alpha(opacity=100);
opacity: 1.0;
border:0;
}
5. Save it and proceed to the next step.
6. Go to Design > add a Gadget > HTML/JavaScript and add the following code to it
<div id="mbtipsboxes">
<div style="left: 0px; overflow: hidden; position: relative; visibility: visible; width: 100%; z-index: 2;">
<ul>
<li>  <div class="mbtipsbody">
<a class="Fadein3" href="Post 1 URL">  <img height="195" src="Post 1 IMG" width="195" />  </a>
<div class="clear">
</div>
<h3>
<a href="Post 1 URL">Post 1 Title</a></h3>
<p>Post 1 Description</p></div>
</li>
<li>  <div class="mbtipsbody">
<a class="Fadein3" href="Post 2 URL">  <img height="195" src="Post 2 IMAGE URL" width="170" />    </a>
<div class="clear">
</div>
<h3>
<a href="Post 2 URL">Post 2 TITLE</a></h3>
<p>Post 2 Description</p></div>
</li>
<li>  <div class="mbtipsbody">
<a class="Fadein3" href="Post 3 URL">  <img height="175" src="Post 3 IMAGE URL" width="195" />  </a>
<div class="clear">
</div>
<h3>
<a href="Post 3 URL">Post 3 TITLE</a></h3>
<p>Post 3 Description</p>
</div>
</li>
<li>  <div class="mbtipsbody">
<a class="Fadein3" href="Post 4 URL" rel="nofollow">  <img height="100" src="Post 4 IMAGE URL" width="170" />  </a>
<div class="clear">
</div>
<h3>
<a href="Post 4 URL" rel="nofollow">Post 4 TITLE</a></h3>
<p>Post 4 Description</p></div>
</li>
</ul>
</div>
</div>
7. Click save , and you are done.
Customize the CSS
You can do pretty much customization but the basic would be:- To change the background simply replace background:#F2F1F1; with your own value.
- To customize the width of the entire widget just change width:938px; with your own value.
Add your own Featured Posts links
You need to replace these values with your own.- Post URL(s) with your own links.
- Post IMAGE URL(s) with your own image links.
- Post Title(s) with your own Featured Post Titles.
- Post Description(s) with your own Featured Posts' Description.
Change Favicon in Blogger Dynamic Views

Lots of Blogger users are shifting from their current templates to the new dynamic view templates and that not it, the strength is increasing day by day. Previously you learned How to Customize your Dynamic view templates. This tutorial is about how to change the favicon in dynamic views. Its very simple just follow the steps below
Change Favicon in Blogger Dynamic view templates
- Go to Blogger.
- Click on the Design tab of your Blog (the one having Dynamic Template enabled), your blog will open in template editor rather than the layout page. Copy your blog ID from the link in your address bar, as show below.
http://www.blogger.com/template-editor.g?blogID=0000000000000000000
3. Now Paste the Copied blog ID in the link below and visit that using your browser.
http://www.blogger.com/rearrange?blogID=0000000000000000000
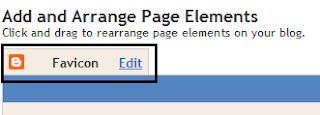
4. Now you will be able to see the Widgets/Gadgets layout page, Just below the "Add and Arrange Page Elements" you will find Favicon. Click edit next to the favicon. (shown in the picture below).
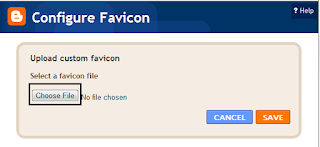
5. Now configure your favicon. Select an image less than 100 KB and it must be a square image.
Note: To change favicon for non dynamic view user
If you wish to share this tutorial (or any other tutorial) on your blog with your reader, you must put a link back to My Blogger Tips or else your blog will be reported to DMCA. You must respect copyrights.
Hand Drawn social media widget with Feedburner chicklet and subscribe button!

I usually love to play around with blogger widgets that I've designed, combine one with another (like I've combined Pro Subscription widget and Hand Drawn Social Media icons' widget here). My most recent widget is the Feedburner Chicklet with subscribe button, by combining it with the hand drawn social media widget it looks very appealing. I mean it really can gather a whole lot of visitors' attention and ultimately would result in boost in subscriptions. It's the perfect subscribe widget for your blogger blog. The installation process is quite easy, no need to edit the HTML of your template
(You can see the Demo here on this blog)
Step 1: Installation Process!
Follow the steps below exactly as mentioned.- Go to Blogger >> Design.
- Add a Gadget.
- Select HTML/Javascript and paste the code below within that.
<style class="text/css">
table
{
border-bottom: 1px solid #E6E6E6;
float: center;
width: 280px;
margin:10px 0 0 20px;
}
.subicons
{
border-right: 1px solid #E6E6E6;
}
.Fadeout {
filter:alpha(opacity=100);
opacity: 1.0;
border:0;
}
.Fadeout:hover{
filter:alpha(opacity=80);
opacity: 0.8;
border:0;
}
</style>
<div class="table">
<table>
<tr>
<td><div class="subicons"><a class="Fadeout" href="http://www.facebook.com/pages/My-Blogger-Tips/220561111314693" imageanchor="1" target="_blank" rel="nofollow"><img border="0" src="https://blogger.googleusercontent.com/img/b/R29vZ2xl/AVvXsEhhgsZ9n_a8OSuc_KmYGDFdK6z0_KY3RPYI_9caHn__46iplKJBAdKRizbxbzZ8yX6Nc9blVAsMW9ziZWLF4wedaNpXJ-0THCNuPD51D9QAmbk8MHfzcD6FGK2Qz2k9vflXYkjg-mUx_8va/s1600/facebook-48.png" /></a></div></td><td><div class="subicons"><a class="Fadeout" href="http://twitter.com/mybloggertips" imageanchor="1" target="_blank" rel="nofollow"><img border="0" src="https://blogger.googleusercontent.com/img/b/R29vZ2xl/AVvXsEhoxHp6Fwst03Q-FnKxFACb5smdOxYPc8MgNgbFcz6bZ8TvPwQEj74RFBnFSp68_0Rj5rymHECtp3VNc7qpRkXWaYYbTWYivgotp9VBzD7xQMi5H-DvCxuEUhvi13gpa4ZR1761pbjiWMu7/s1600/twitter-48.png" /></a></div></td>
<td><div class="subicons"><a class="Fadeout" href="http://feeds.feedburner.com/mybloggertips" imageanchor="1" target="_blank" rel="nofollow"><img border="0" src="https://blogger.googleusercontent.com/img/b/R29vZ2xl/AVvXsEg-QcPM1cBqJWscl6G7XdF_MrSmaGLgtymF-FBNEUquzPUciJP4dx3fb7YmoFMcILi1quiOEEVEA4m9qiQFilLC1weldsjFjpilbBPn60lKrhf3dIMOaKxdJpsynZdjFt5CfA03GJN4UQjr/s1600/rss-48.png" /></a></div></td>
<td><a class="Fadeout" href="https://plus.google.com/110875602250977569192/posts" imageanchor="1" target="_blank" rel="nofollow"><img border="0" src="https://blogger.googleusercontent.com/img/b/R29vZ2xl/AVvXsEjXPSump8ptgcs2JYih80NtxAss4gnUVlH6ErG2TCkfQYvg94GqgvKGbxkspclGK7c68o6r7OtVXVtp1o6PkQX1UeYGE3n5fwqdaN3fWW-JwRjRW5v2569rCmDRb5TZFcm-lBUxAjzpyv94/s1600/google-48.png" /></a></td>
</tr></table>
</div>
<style>
.rssbuttontable
{
border: 1px solid #E6E6E6;
background: #FFDCB1;
float: center;
width: 270px;
margin-left:10px;
padding: 5px 5px 5px 5px;
border-radius: 5px;
-moz-border-radius: 5px;
height: 35px;
float: left;
display: inline;
margin-top:5px;
margin-bottom:5px;
}
input.Subscriberssbutton
{
background:-moz-linear-gradient(top,#F88017 0%,#FF6600 100%); background:-webkit-gradient(linear,left top,left bottom,from(#F88017),to(#FF6600));
border: 1px solid #FF6600;
text-transform: none;
font:bold 13px arial;
color: #fff;
height: 30px;
padding: 4px 2px 5px 2px;
margin: 0px 0 0x 0px;
border-radius: 5px;
-moz-border-radius: 5px;
-webkit-border-radius: 5px;
cursor:pointer;
display: inline;
}
</style>
<table class="rssbuttontable">
<tr>
<td>
<a rel="nofollow" href="http://feeds.feedburner.com/mybloggertips"><img src="http://feeds.feedburner.com/~fc/mybloggertips?bg=FF6600&fg=444444&anim=1" height="26" width="88" style="border:0" alt="" />
</a>
</td>
<td>
<input value="Subscribe to Get Updates" class="Subscriberssbutton" type="button" onclick="window.open('http://feedburner.google.com/fb/a/mailverify?uri=mybloggertips', 'popupwindow', 'scrollbars=yes,width=650,height=570');return true" /></td></tr></table>
4. Before saving you need to replace some values with your own. Process to next step.
Step 2: Add your Own values!
Replace:- http://www.facebook.com/pages/My-Blogger-Tips/220561111314693 with your facebook fanpage. (If you don't have one, create it here)
- http://twitter.com/mybloggertips with your twitter page.
- http://feeds.feedburner.com/mybloggertips with your feedburner link.
- https://plus.google.com/110875602250977569192/posts with your Google + page.
- mybloggertips (from the lower part of the code above) with your feedburner id. It appears 3 times, change 'em all.
How to earn from your blog
So you have a blog but want to maximise your earning potential from it. There are many ways you can earn to blog or earn by blogging. Depending on what type of blog you have and what you are blogging about will factor into how you earn from your blog.When it comes to making money from your blog there is more than one stream of revenue you can have. Hands down the best solution for a majority of blogs is Google Adsense and affiliate promotion. Adsense covers a vast array of different topics and is contextual so will serve up relevant ads on your site. The other option is promoting affiliate products where you get a commission once a customer from your site buys a product from the affiliate you are promoting.
If you want to earn from your blog the best way to do this is to promote products by placing links on your blog. You first need to join an affiliate network. Once approved you can add links to your site and earn anything up to a hundred dollars promoting products and services. One of the great things about doing this is that you can promote things that are free for your visitors and still get paid. Join now and start earning.
Earn to blog, Blog to earn
Besides these two main options there are a number of other ways on how to (l)earn to blog. The main areas you can earn in are from PPC or pay per click, this is where you earn money every time a visitor clicks on one of your ads. There is also CPA or cost per action, this is where a visitor clicks on the ad and performs an action such as buying a product or service or signing up for a newsletter or some other free action.Make Money Online With Your Knowledge -
SBI Provides All the Tools and Training to Succeed
 Because I've been running successful online businesses for many years, people always ask me how they can achieve a similar level of success. How can I build a high-traffic website? How can I make money online? What do I have to do to quit my day job? Will you mentor me?
These questions have always frustrated me.
The problem was that I couldn't readily teach people to do what I do, at least not the way I do it. I'm too old school. I've been using the Internet since 1989, and I built my first income-generating website in 1995. Most of the money I've earned in my life has come from my online businesses. But my approach has been virtually unteachable. Believe me -- I've tried. After delivering a few workshops on blogging, it became obvious to me that I couldn't teach this. I was overwhelming people with more info than they could handle. People got excited by the ideas, but they couldn't implement them. In truth there's just way too much hidden complexity in my approach.
Another frustrating element was watching people who were inspired by my articles "How to Make Money From Your Blog," "How to Build a High-Traffic Website," and "10 Reasons You Should Never Get a Job." The first article even clearly states that 99 out of 100 people won't be able to do this, but that didn't stop people from trying to duplicate (or surpass) my results anyway. Nearly all of them gave up within the first six months. We're talking hundreds of people that I know of. Starting a blog is dead simple these days. Creating a highly profitable, high-traffic website from scratch is very, very hard if you've never done it before.
An Unexpected Solution
The reason I'm writing this article is that I finally found a practical solution for people who want to build a successful online business without getting lost in a sea of technical details, using essentially the same business model I used to build StevePavlina.com. I'll explain the details in a moment.When I started StevePavlina.com, I'd already been running a previous online business full-time for nearly a decade. StevePavlina.com didn't succeed because I was lucky or brilliant. It succeeded because I'd already invested thousands of hours and thousands of dollars in an earlier business. I paid my dues the hard way. The articles I wrote merely scratched the surface of the complex lessons to be learned.
Eventually I gave up trying to teach people how to build an online business. Recently I received two more invitations to do my blogging workshop, and I turned them both down. I'd rather invest my time and energy where I can be more effective.
Late last year I had an interesting phone call with a successful entrepreneur named Ken Evoy. A mutual contact put us in touch, suggesting that we definitely needed to work together. Ken founded an interesting business called Site Build It!, a fascinating service that helps people build income-generating web sites. They provide complete hosting as well as an extensive suite of tools to help you build traffic and generate meaningful income.
Well... Ken and I had such similar business philosophies that our phone call lasted more than 2-1/2 hours. This guy is really passionate about helping people build businesses online, and he found a way to succeed where I could not. Ken realized just as I did that the technological complexity required to build a successful online business is just way too high for most people.
At first he tried to teach people how to do it -- even writing a book on the subject (it sold over 100,000 copies, so he knew what he was doing) -- but he ran into the same frustrating problems I did. No matter how clearly you explain it, it's just really hard for people to grasp the details, so they always screw it up. But instead of trying to teach people how to handle every little technical detail, Ken decided to build a service that would do it for them, automating as much as of the process as humanly possible. Ten years later Ken's vision is a huge success, with thousands of "raving fan" customers who've built real income-generating websites via Site Build It!
Ken is an incredibly hands-on entrepreneur with a rare level of dedication to his customers. He's extremely active in the Site Build It! members-only forums, with more than 4,700 posts of his own. That's way more than I've made in the StevePavlina.com forums, and I thought I was pretty active. Ken makes a tremendous personal effort to help people succeed, and from talking to him myself, I could tell that his interest in people is authentic. Ken isn't alone though -- there are lots of highly active members in their forums who are passionate about helping each other. This definitely isn't a take-your-money-and-run operation.
How to Build a Profitable Online Business
Site Build It! is designed around a simple formula, which they refer to as CTPM. This stands for Content -> Traffic -> Presell -> Monetize.
The major limiting step in this formula is building traffic. If you can't build decent traffic, you won't succeed. But the overall formula is sound, and it works if you do it correctly. It just happens to be very difficult for human beings to apply it without screwing it up. The advantage of Site Build It! is that it provides technical solutions to help reduce your chances of making mistakes. Where it cannot provide a technical solution, it provides clear instructions and education to help you succeed.
Even with Site Build It!, there's still no guarantee of success. This isn't a get-rich-quick scheme. It will still take commitment and effort to build a successful online business. But this robust suite of tools will definitely put the odds of success in your favor. You don't have to become a technology expert to earn enough to quit your day job.
The key benefit of Site Build It! is that it provides tools, guidance, and coaching to help you stay focused on the correct actions. This begins with providing easy-to-use research tools to help you figure out what kind of site to create in the first place. A lot of people fail because they create sites that were doomed from the very beginning. It really saddens me when a blogger emails me to say that s/he is still getting no traffic even after writing 100+ articles. I don't like telling people that they made their biggest mistake before the site was even launched by choosing a topic with virtually no demand... or one that's oversaturated with entrenched competition. Site Build It! can help you avoid soul-crushing problems like this.
Why Use Site Build It?
If you already run a successful online business that generates thousands of dollars a month in income for you, you don't necessarily need Site Build It! But if that's your situation, I highly recommend you join their affiliate program, which will give you an extra passive income stream. (To learn more about their affiliate program, scroll to the bottom of this page, or visit their Affiliate Center directly.)However, if you're new to online business, or if you've tried and failed, or if you're stuck trying to build traffic and generate income, then you should definitely take a look at Site Build It!
With Site Build It! you don't have to build your web pages from scratch using HTML and CSS. They provide point-and-click tools and templates to generate your pages quickly and easily, including images. This allows you to focus on writing your content instead of wrestling with the underlying technology. Of course, if you're already comfortable with tools like Dreamweaver, Photoshop, and Flash, knock yourself out. Site Build It! is compatible with other HTML editors, so you're always free to fall back on your own tools if that's your preference. This gives you maximum flexibility to create the look and feel you want.
All the Tools, Training, and Support You Need to Build Your Own Income-Generating Website
Site Build It! includes an extensive suite of tools to help you build a successful online business every step of the way, including:- domain name registration
- web site hosting
- point-and-click page creation
- content management
- blogging
- market research
- traffic stats
- search engine optimization
- auto-responders
- form builder
- graphic manager
- customizable templates
- sitemaps
- RSS feeds
- web mail
- newsletter management
Site Build It! provides unlimited customer support as well as private discussion forums where thousands of members share tips and advice. I browsed their forums myself and saw a lot of enthusiastic members helping each other. It's an extremely active community with hundreds of thousands of posts. They also have a team of moderators and in-house editorial staff who glean the best pearls from their forums and turn them into articles -- on everything from brainstorming to monetizing.
Their near weekly newsletter keeps you up to date on the current best practices as well as additions and updates to their "Info HQ" knowledge base. They track what's happening in the world of e-business (over 100 feeds, blogs, e-zines), so you don't have to. This makes it easy for you to focus on your business without worrying that you're missing important opportunities.
Site Build It! is basically an all-in-one solution for building a successful online business. They continue to add new tools and refine their existing tools to keep the service state-of-the-art.
Getting Started
I encourage you to look into Site Build It! to see if it makes sense for you. I recommend you start with the Site Build It! home page, watch the 2-1/2 minute video there, and follow whichever links interest you. The 30-minute video tour is a must -- it will really clarify everything for you. The video tour starts out mostly motivational in tone (i.e. benefits of working from home), but later on it dives into the details of how the tools and monetization strategies work, using real web sites as examples. I think you'll find it educational even if you have only a minor interest in making money online.If what you see arouses your interest, but you're skeptical about what to expect, you'll definitely want to read my step-by-step Site Build It! walkthrough next. I explain exactly what to expect during the first 10 days, from the time you sign up until your new money-making website is online. I wrote this walkthrough myself from scratch -- it wasn't provided by the Site Build It! team. I also offer some additional thoughts about who should consider Site Build It! and who shouldn't.
If you really want to do your homework, I suggest checking out some of the success story videos submitted by their customers as well as their in-depth case studies. If you have any questions about Site Build It!, you can submit them via the questions form, and you'll get an answer from a real Site Build It! owner/user.
Of course Site Build It! comes with a money-back guarantee, so there's no risk to try it for yourself. You can test drive it for 30 days and get a full refund if you don't like it. If you register a domain name through Site Build It!, you can even keep your new domain for free if you later decide to quit. That's a better than money-back guarantee, since you get a free domain name no matter what. Also, if you decide to quit after 30 days, you can get a pro-rated refund for the unused portion of your subscription... and of course still keep your new domain name too.
Take Action
If I hadn't already learned how to build an online business the hard way, I'd use Site Build It! to get there much faster. It would have shaved years off my learning curve if this had been available when I created my first income-generating site back in 1995.I strongly recommend you use Site Build It! if you want to successfully generate income online. A year from now you'll be very glad you took action on this today, when you're enjoying the benefits of passive income.
 Subscribe to my Feed
Subscribe to:
Posts (Atom)


